
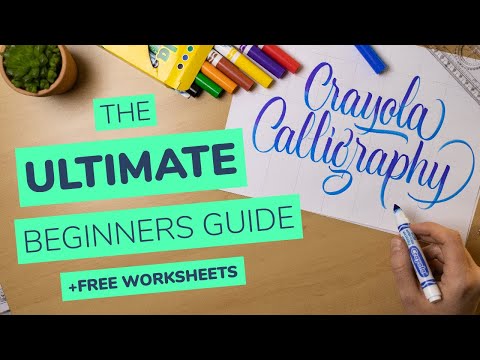
Do you want to learn how to do calligraphy using the Crayola marker?
You’ve come to the right place!
In this tutorial, I will teach you everything you need to know how to get started with Crayola calligraphy. Step by step.
I’ve gathered all my foundational articles, style guides, and practice tips in the main resource page for calligraphy so you can easily navigate what you need.
Before we get started, let’s have a quick overview of this tutorial –
- The needed tools for Crayola calligraphy
- Crayola marker vs. regular brush pen – a brief overview
- How to hold the Crayola marker
- How to get started with Crayola calligraphy – basic strokes + FREE worksheets
- Thick & thin transitions
- Final words
Without any further delays, grab your Crayola’s, and let’s get crackin’!
If you prefer watching over reading, I’ve also made a YouTube video you can check out instead –
1. What tools do you need for Crayola calligraphy?
To do Crayola calligraphy, you’ll need just a few essential calligraphy tools, which are (all link to Amazon) –
")
The Crayola markers I am using are the classic broad tip ones.
If you don’t have a Crayola marker, you can go with any other cone-shaped marker you can find.
I found a few alternatives. You can check them out here and here (links to Amazon).
The Crayola marker is quite popular worldwide, and best of all, it’s super cheap!
Aside from the Crayola markers, you will also need a pencil and a ruler to draw your guidelines.
It can be any type of pencil. I use this mechanical pencil here (links to Amazon).
As for the ruler, I always recommend getting a rolling ruler.
")
It’s like a standard ruler.
It just has a cylinder on the back that allows me to quickly draw my calligraphy guidelines without any hustle.
Super useful, and I use it all the time.
As for the paper, when working with Crayola markers, you have a more flexible choice.
That’s because the Crayola’s are super durable.
It means that their tip won’t fray as easily as, for example – the Tombow Dual brush pen.
Feel free to use the ever so popular – HP 32 Premium (links to Amazon), which is the best bang for your buck.
")
However, for best results, I would always go for a smooth bleed proof marker paper such as (links to Amazon) –
If you plan to do color blending (yup, you can do that with Crayola’s), then watercolor paper will be more suitable.
If you want to learn more about calligraphy papers, check out my separate guide.
Ok, now that we know what tools we need for Crayola calligraphy, we can proceed to the next part of this tutorial.
2. Crayola marker vs. Regular brush pen – a quick overview
I wanted to point out a few key differences between the Crayola marker and a brush pen.
When doing brush calligraphy, the most commonly used tool is, well, a brush pen.
The main characteristic of a brush pen is a flexible tip that bends depending on the amount of pressure you add as you write.
By changing the amount of pressure while you write, you can achieve the characteristic thick & thin strokes we see in brush calligraphy.

Well, the Crayola marker isn’t technically a brush pen since it doesn’t have a flexible tip that bends in the same way a brush pen does.
The Crayola marker has a cone-shaped tip that is not very flexible.
")
Despite its unconventional shape, you can still use it to create some fantastic looking brush calligraphy.
And due to the tip’s different shape, doing calligraphy with a Crayola marker and a regular brush pen isn’t exactly the same.
That being said, let’s proceed to the next section, which is –
3. How to hold the Crayola marker.
I remember back when I first bought the Crayola markers, I used to hate them.
I couldn’t figure out how to use them the same way I used my other brush pens.
Ironically, that was precisely my problem.
I was trying to use the Crayolas in the same way, I was using my other brush pens.
As we just saw, the Crayola marker tip is quite different from the one of a brush pen.
With that in mind, I suggest holding the Crayola marker at a lower angle than you would a regular brush pen.
The idea is that the lower angle allows you to place the whole side of the Crayola tip on the paper, which gives us a nice solid thick line.
-01")
")
Here is an example of how I hold the Crayola marker vs. a regular brush pen, i.e., The Tombow Dual Brush Pen –

Additionally, I keep my index finger on the top of the barrel rather than on its side, as I do with the regular brush pen.
")
The purpose of the index finger is solely to add a bit of pressure on my downstrokes.
In junction with the lower angle of the pen, I can create a solid contrast between the thick & thins in a gentle motion without adding a lot of pressure.
3.1 Arm movements.
Besides the hold, it’s also crucial to mention how you move your arm to form the letters.
Avoid creating your letters using finger and wrist movements – the same way you do with your handwriting.
The fingers are here to hold the tool in place and to gently apply pressure when needed.
Instead, your movements should come mainly from your forearm and assisted by the wrist when creating the curved letters.
")
Additionally, I also like to spread my elbow on the table.
It gives me more room to move around.
This allows me to create smoother and better-looking shapes.
")
3.2 Try avoiding these things.
If you try holding the Crayola marker the same way you use a regular brush pen, you will notice that you can’t really achieve a nice contrast between the thick and thin lines.
")
As mentioned, this was exactly my issue, and I was trying to increase the contrast between the thick and thin by adding a lot of pressure.
")
By adding more pressure I was able to increase the contrast between the thick & thin lines.
However, by doing that, I was automatically creating tension in my hand, which was decreasing the control of my movements.
Also, by adding all that pressure, I was bending the tips a lot, which would eventually ruin them.
")
Another crucial mistake I was making was that I was bending my wrist while I was writing.
That was also creating tension in my arm and again, decreasing the control of my movements.
A simple solution for that is to just turn the page rather than your wrist.
")
")
Generally speaking, try to hold the pen firmly but not too tight, and let your arm sit in a natural and comfortable position.
4. How to get started with Crayola calligraphy – The basic strokes + FREE worksheets.
First of all, let’s cover the basic calligraphy strokes.
Afterward, we can proceed to the full alphabet, and I’ve also prepared some free worksheets to help you bridge the theory with practice.
4.1 The basic calligraphy strokes.
Another mistake I was making back when I started was thinking that calligraphy is the same as cursive writing but with added thickness to certain strokes.
Well, it’s not :D.
")
")
Calligraphy can be broken down into individual strokes.
Knowing and understanding these basic strokes will allow you to write the letters much easier.
You will also be able to produce much more beautiful and consistent letterforms.
Let’s begin with the two fundamental strokes, which are the upstroke and downstroke.
- When we move up, the strokes are thin.
- When we move down, the strokes are thick.
")
Pretty simple, right?
Once you have a solid grasp of these two fundamental motions, we can move on towards the 8 basic calligraphy strokes.
I believe that the best and easiest way to learn how to write the alphabet letters is by using the 8 basic calligraphy strokes.
You see, many of the letters share similar shapes, and by learning these basic strokes, it will be much easier to learn and practice the whole alphabet.
The 8 basic strokes are –
- upstroke
- downstroke
- underturn
- overturn
- compound curve
- oval
- ascending loop
- descending loop
")
For example, to create the letter a, we would combine the oval stroke with the underturn stroke.
For the letter h, we would combine the ascending loop with the compound curve, and so on.
")
I created a whole separate tutorial that will teach you about the basic calligraphy strokes and how to use them in your calligraphy.
By learning this method, you will never have to guess and memorize the shapes of the letters, and on top of that, it will drastically increase the consistency of your letterforms.
There are a few letters that are not combined using these basic strokes.
They have unique shapes that you just have to memorize.
I don’t think they are challenging to do. I just wanted to point this out to avoid any confusion.
The letters I’m talking about are – s, r, and x.
")
4.2 The Crayola calligraphy alphabet.
Ok, Once we know the basic strokes, creating the alphabet is just a matter of combining them in the right order.
Here you can see me writing out the whole alphabet using these basic strokes.
For each stroke, I am using a different color to better show how the letters are constructed.
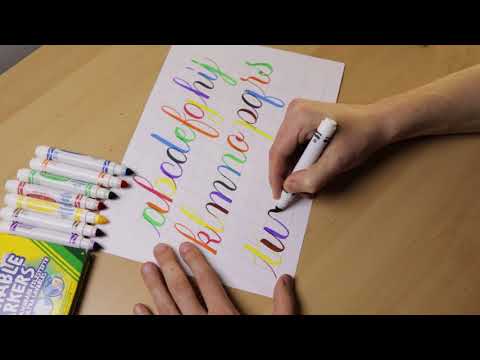
Again, calligraphy is not the same as cursive writing.
Make sure not to rush and to lift your pen after each of the strokes.
I’ve done this so many times that I’ve already managed to memorize the whole alphabet.
But if you are just getting started, it will take you some time to get used to it.
This brings me to the next section of this article.
4.3 The Free Crayola calligraphy worksheets.
To help you with your calligraphy practice, I’ve created some free printable worksheets that include the following –
- Up thin down thick worksheet
- The Basic calligraphy strokes
- Both the Capitals and minuscule letters
- And an Empty practice worksheet for your letters, words, or whatever you want.
")
")
")
")
Like many other skills, the best way to learn calligraphy is by gradually moving from easy to more challenging elements.
With that in mind, if you are just getting started, I would highly recommend that you start with the basic strokes and gradually move your way towards the whole alphabet.
You can download the worksheets directly from the Lettering Crate.
It’s an exclusive content area that I created to keep ALL of my free worksheets, free procreate brushes, planners, and other helpful freebies for those who are not familiar with the Lettering Crate.
To get access to the Lettering Crate, simply drop your email below.
You will receive a welcome email that contains a link and the password to enter the Lettering crate.

Stay updated with my tutorials and get instant access to the Lettering Crate –
A growing library of free lettering & calligraphy resources that includes –
5. Thick & thin stroke transitions.
A common thing beginners tend to struggle with is the thick & thin transitions.
With practice and time, you will start building up that muscle memory, and it will become much easier.
In the meantime, I wanted to share two different techniques you can use to practice your transitions.
Technique #1 – The gradual transition
This technique focuses on creating the transitions, well, as the name says – gradually.
Let’s make a few examples to explain it better.
For this example, I’ll use the underturn basic stroke.
I start to apply pressure right away, and as I get closer to the baseline, I gradually begin to reduce the amount of pressure.
")
I slowly curve one the baseline where I completely transition into a thin line up to the waist line.
Here is another example with the letter a.
When I was starting, a good tip I received was to imagine a line right above the baseline and one sitting right under the waistline.
")
This imaginary line aims to know when to start releasing the pressure and transition into that thin line.
This technique gives me a nice tapered look to the strokes—a smooth and more gentle look.
Technique #2 – Divide the strokes
I think this technique might be a bit easier than the gradual method.
The idea is simple: you do a single stroke, stop, and then do another one.
Here is an example with the letter a.
I do a curved downstroke, and I stop.
At the right bottom edge of this curved stroke, I create a thin upstroke.
I then make another thicker downstroke and, again, another thin upstroke.
")
This technique gives us a rougher look in comparison to the gradual transition.
Depending on the style and look you are going for, this might be a better fit.
")
Try them both out and see which one you prefer.
Perhaps you can also come up with your transitional technique.
As you can see, this isn’t really rocket science.
The more you will practice, the more control you will have over the tool.
So don’t get discouraged if you can’t get smooth transitions right off the bat.
Before we wrap this up, I just wanted to mention something quickly.
One of the key ingredients needed to improve your skills is consistent practice.
However, the way you practice makes all the difference in how quickly you start noticing these improvements.
")
I’ve recently created a video/article where I share 7 easy brush lettering tips for beginners.
These tips can be applied to Crayola calligraphy as well.
You can either watch the video that I made –
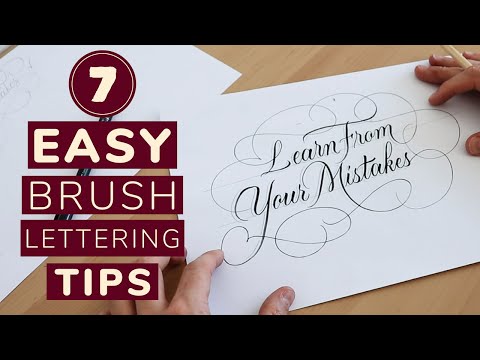
Or, if you prefer to read, here you can check out the article on my website.
Final words
And there you have it, friends.
I hope this guide was helpful enough to get you started.
At first, the Crayola markers may seem to have a bit of a learning curve, but don’t get discouraged by it.
Adjusting the way you hold your pen will also give you a deeper understanding of how different calligraphy tools work and how your hold impacts how you write.
Remember to move gradually from easier to more difficult tasks, but most importantly –
Have fun, and enjoy the learning process!
BTW. Did you know that the pencil is also a super cheap and cool tool that you can use for practicing calligraphy?
I wrote a whole separate tutorial on how to do pencil calligraphy.
If you would like to learn a different style, check out my article on the 10 calligraphy styles for beginners.
Let me know if you have any questions about Crayola calligraphy down in the comments.
The same goes in case you have any suggestions for future videos and tutorials you would like me to create.
Be sure also to check out the official Facebook group. It’s a place where you can –
- Get constructive feedback
- Share your work
- Ask questions
- Meet fellow lettering & calligraphy artists
- And much more
Until the next one,
Stay AWESOME!
Pin me!

About the author

Hey, I’m Max. I’ve been drawing and messing around with letters since 2011. I don’t have a formal art degree—my background is actually in the kitchen as a former chef and on the streets painting graffiti with my friends. Over the last decade, through a ton of trial and error, I somehow turned that obsession into a full-time gig. These days, I design custom logotypes for global brands and paint large-scale murals. I started Lettering Daily just to create the kind of honest, no-BS tutorials I wish I’d had when I was starting out. Stick around, and let’s draw some letters.


Thank you for the video. I’m so excited to learn. Please send me the free worksheets. Thank you so much.
I have been taking an on-line brush calligraphy class, and am enjoying it. I have seen comments about using Crayola Markers, but wasn’t sure how to use them. Your information was very helpful. I tried the basic shapes and then some letters. I was amazed at how sharp and clear my letters were with Crayola Markers. I will certainly experiment more. They make really nice, large, clear letters.
Gailyn
Crayola’s freaking rock! Im so glad to hear that this was helpful to you 🙂
Thanks!
Wow, amazing tutorials, content and calligraphy resources, thank you so much Max. Keep it up.
Thank you so much for the kind words 🙂
Your writing is so beautiful! Thank you for sharing your knowledge. I’ve learned so much just by watching you work.
Thank you so much for the kind words, Rupali! 🙂
thanks. Loved the videos
Thank you so much, Vickie! 🙂