Are you trying to learn how to prepare your calligraphy nibs for writing?
Well, you’ve come to the right place!
Hey, this is Sarah from @sarahscript and in this article, I’ll go over the different cleaning methods (commonly called prepping) for your nibs and how I clean my nibs as I’m working on a project.
So without any further delays let’s get to it!
Looking for more calligraphy tutorials like this? I’ve collected them all in one place — visit the Calligraphy Hub to dive in.
Pin me!

Here is why you need to prepare your calligraphy nibs
One thing I wasn’t taught when I took that modern calligraphy workshop was to keep my nibs clean!
In the beginning, I was writing with ink caked on my nib (Embarrassing, I know 🤦🏻♀️).
Picture it: The nibs you ordered came in, and you’re ready to finally start writing with them! You put them into your flange or staff and dip the nib—Wait! Stop! Before you begin writing with your new nibs, you need to prep them for writing!
The nibs you order will come with a manufacturer’s oil coating to protect them and keep them from rusting.
This is helpful if you’re the type of calligrapher who orders, say, 100 nibs at a time!
However, that oil coating needs to be removed before you dip your nib into the ink and start writing.
Do you ever struggle with ink blobbing off your nib into a big inkblot onto your paper?
Or not coming off the nib at all?
That’s a sign you need to prep (clean) your nib!
")
As you can see, the ink bubbles up on the unprepared nib and is not adhering to the nib.
This will either cause the ink to just fall off the nib or not deposit the ink onto your paper at all.
In contrast, the prepped nib is nicely covered with ink, and the ink is adhering to the nib.
Now, how do we prep nibs?
Well, there are several interesting and somewhat unexpected ways to clean off that oil coating!
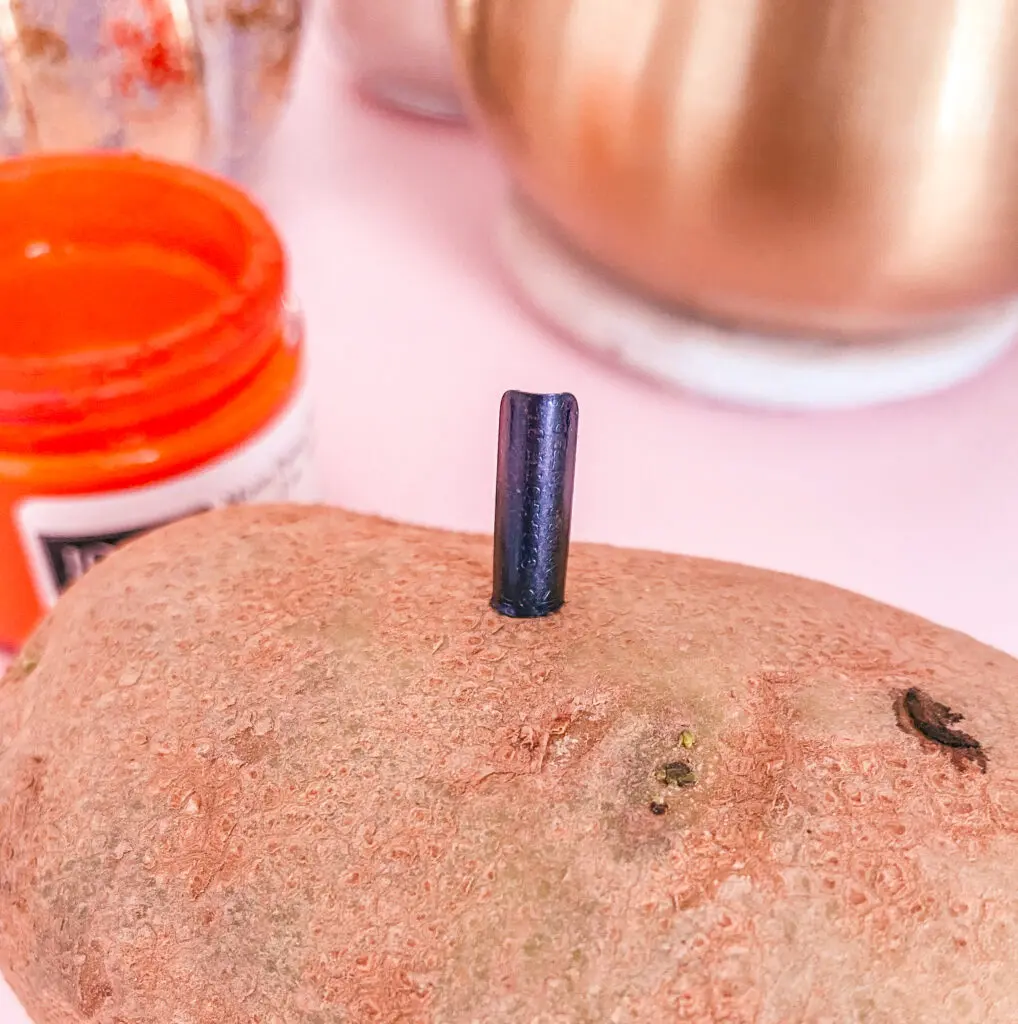
1. Use a Potato to clean your calligraphy nibs
A potato?! Seriously?
Yes, seriously!
If I need to prep a large number of nibs for a workshop, I will use this method.
However, it’s not my favorite. I’ll buy a couple of potatoes and I’ll gently stick the nibs into them (about halfway) and then leave them there for about 5 to 10 minutes.
Warning: Don’t leave the nibs in the potato for longer than 15 minutes because they will rust!
I always say that when using this method, you should only do it with more sturdy nibs like G Nibs because it could damage more delicate nibs, but fair warning that it can break a G Nib too:

I was definitely not expecting that to happen, so it’s good to know that even sturdy nibs are not immune from misaligning the tines with this method.
So, I started over with a Gillott 404 nib and left it sitting in the russet potato for about 10 minutes.
I am happy to report that not only did the nib not break this time, it also worked well to remove the oil coating!
2. Prepping the nib with Acetone (Nail Polish Remover)
This one surprised me.
I had not tried this one before, and I was pleasantly surprised.
I happened to have picked up some nail polish remover wraps from the grocery today experimented with cleaning the protective coating off the nib with one, and it worked like a charm!
I just rubbed the nib with the acetone soaked strip, then dried it off with a paper towel.
")
This seems like an excellent option for prepping nibs if you are working at a public event for an on-site calligraphy gig.
3. Clean the nib with Saliva
This is the cheapest and fastest (albeit having a slight “ew” factor) method of prepping your nibs and how I prep my nibs pretty much 95% of the time.
However, I wouldn’t recommend using this method if you are working on an on-site event at a public place, especially because on-site calligraphy events tend to be at more up-scale locations.
I just put a little saliva onto a paper towel and rub off the manufacturer’s coating with the saliva.
Next, I wipe it off again with a dry portion of the paper towel (My favorite paper towel brand for cleaning my nibs is Viva Paper Towels) and then dip it into ink.
I check to make sure that the ink is nicely covering the nib, and if not, I will then add a bit more saliva and repeat the steps.
")
Viva Paper Towel, Hunt 101 Nib, Turned Wood Zanerian Oblique Holder with Rose Gold flange from John Neal Books.
4. Clean the nib with toothpaste
Look, I have heard many calligraphers suggest the toothpaste method to remove the manufacturer’s oil, and I have even suggested it just because I heard so many other people suggesting it!
I know, I know, I should have done my own research first before suggesting it to others, but I just figured it worked since it was constantly mentioned.
So, for my little experiment, I wet a toothbrush with water, added a teeny tiny pea-sized amount of toothpaste, and brushed the nib for about a minute.
I made sure to get all of the nooks and crannies.
We don’t want any cavities!
I then wiped off the water and toothpaste mixture with a paper towel to dry it off entirely and dipped it into the ink, only to find that the ink was not adhering to the nib.
")
So I repeated the process again, and again it did not work.
Third time’s a charm?
No such luck.
At this point, I’m certain there is something I am doing wrong because the ink is just not adhering!
I also don’t want to waste any more toothpaste, so I quickly pass the nib through a flame, and voila, the ink adheres to the nib.
Moral of the story? Leave the toothpaste for your molars.
5. Pass the nib through a flame
I don’t always recommend this because, well, fire can be dangerous, and if the nib is not passed through the flame quickly enough, you’ll damage your nib and not be able to write with it all, and no one wants that!
You want to only pass it through the flame for no more than one second. This method works pretty well, and I *do* love a candle burning while I write. It’s just so romantic, you know?
But again, this method is not for you if you don’t want to accidentally burn your nib and not be able to write with it at all.
")
So, what’s the best way to prep your nib?
It depends on the context.
For a public place?
Acetone.
For a workshop?
Potato.
For writing at home?
Saliva and paper towel.
Clean your nib during and after a project
Not only do you want to clean your nib off when it first arrives, but you also want to keep your nibs clean as you write and after you are finished writing.
To keep your nibs clean while you write, every so often, when you find a stopping point in your work, you want to clean the ink off with a paper towel (Again, I prefer Viva Paper Towels) and then dip it into a small jar of water to remove any excess ink, and then wipe it off again with a paper towel.
I recommend cleaning your nib off even you are setting down your pen for more than 30 seconds.
After you are finished with a project, you want to clean your nib and remove it from the flange and dry both well to prevent the nib and flange from rusting.
Make sure the nib is completely dry and store it in a small container.
")
To sum everything up
Be sure to clean your new nibs before you start writing with them with one of the methods mentioned above:
- Pass Quickly Through A Flame
- Saliva and a Paper Towel
- Potato
- Toothpaste (Didn’t work well for me)
- Acetone (Nail Polish Remover)
Also, be sure to clean your nibs while you write and after you have finished working on a project.
Finally, always remove your nib from the flange so that the nib and flange don’t rust, and store your cleaned nib in a jar.
In short, a clean nib is a happy nib, and keeping it clean will prolong the life of your nib.
I hope this was helpful! If you’re interested in practicing pointed pen Flourishing Exercises, you can head to my website www.sarahscript.com and join my newsletter list to receive a Free two-page flourishing exercise worksheet in your inbox.
I’d also love to meet you on Instagram, so come say hello @sarahscript.

Stay updated with my tutorials and get instant access to the Lettering Crate –
A growing library of free lettering & calligraphy resources that includes –
About the author

Hi there! I’m Sarah Richardson (@sarahscript), and I’ve been practicing calligraphy, specifically pointed pen calligraphy, for the past six years. I started my journey in this art with a modern calligraphy workshop, but I have been in love with Copperplate calligraphy for the past four years. I even got the opportunity to write a book on the subject two years ago called Copperplate Calligraphy from A to Z. You can find out more about me and my work by visiting my website and social media platforms.


Hi Sarah! Thank you for all of your tips and tricks! About preparing a new, never been used nib – with my pointed pen nibs, I do four quick passes of the nib alternating between the top and bottom and then dunk into ink and wipe it off. It realigns the metal so they work better and not only takes off the protective oil coating, but puts a helpful little coating of the ink as well. Of course keeping your nibs clean and dry between uses is paramount as you said. If I am using broad edged pen nibs, I will do the saliva thing also. Actually, I probably do the saliva, dry, flame, dunk thing – with the reservoir off if it has one and that’s possible.
Hi Sarah!
I appreciate your tutorials and had me laughing at your wit! You are so talented and funny! I will read all these articles and will try to start lettering in the future.
Thanks for this article, I am just about to start learning calligraphy (waiting on my first holder and nib order to arrive), and it is great to know the right way before I start, I will probably use either acetone or alcohol because as a nail artist I have those easy to hand.
This is very helpful. Does this method works on all the nibs. Like Tape and Brause.
Yes! All types of metal nibs need to be prepped.
We clean with Window Cleaner. It works quickly. Just a different method. Have used toothpaste too. The window cleaner I don’t get so messy.
Great tip! Thanks, Janet!
Thank you for the tips, Sara!
All I ever tried was 70% alcohol, but it worked perfectly for me so I never did anything else 😌
Oh awesome! Thanks!
Hi Sarah, I agree with Rosemarie about using the toothpaste, not gel. I keep the little ones my dentist gives me. Also, rub the toothpaste on the nib with your finger to get the friction going to get the coating off. A brush won’t do that. Thanks for the other tips! I always have heard how good the potato thing is, but I tend to use more fragile nibs, and now I am certain I will avoid that method!
Oh okay cool, thanks so much for the helpful tips, Antonine! 🙂
For 4 Toothpaste – try using toothPASTE rather than the better tasting toothGEL. The gel hasn’t worked for me either but when I tried a small travel-sized tube of actual toothPASTE I got great results.
Hey Rosemarie, thank you for the suggestion, I really appreciate it. Honestly, I didn’t even know there was a difference, but it’s good to know that they are not all the same! 🙂
I was going to say the same thing!
This is from WikiHow: Choose a plain, solid-colored toothpaste with no baking soda, tartar control, or whitening agents. These “extras” are too abrasive and can scratch your jewelry. At the same time, however, you’ll want to avoid using gel toothpaste because it isn’t abrasive enough to remove tarnish. Dampen the silver with some water.
Ah okay, this is so helpful! Thank you! 🙂
Thank you so much, Rosemarie! Now I know that this is an important distinction! Thanks again!