Hi everyone!
My name is Claudia and I’m a freelance Illustrator and graphic designer since 2015.
After I was done with my university, I decided to keep my studies going and apply for a Masters in Illustration at BAU University in Barcelona, Spain.
I learned so much during that period and I’m really excited to share some of my knowledge with you guys today!
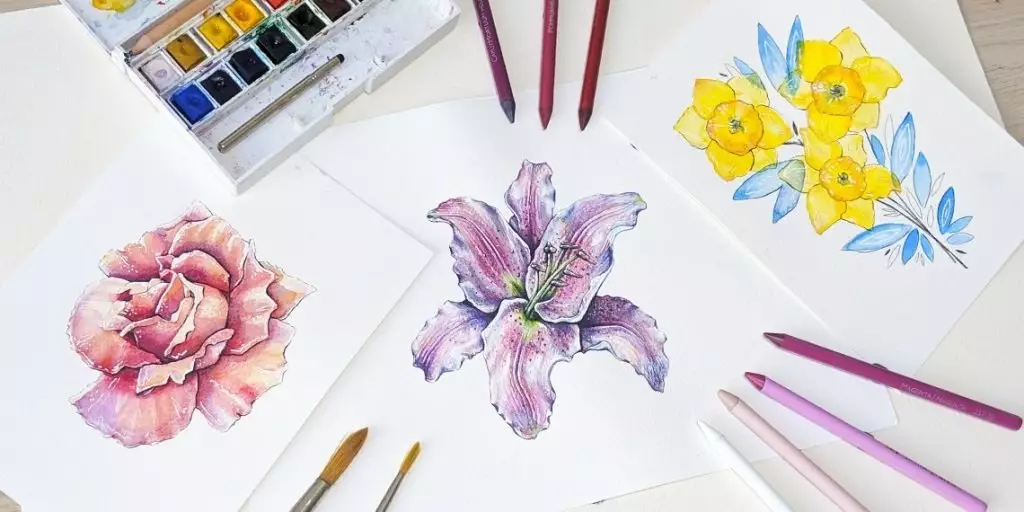
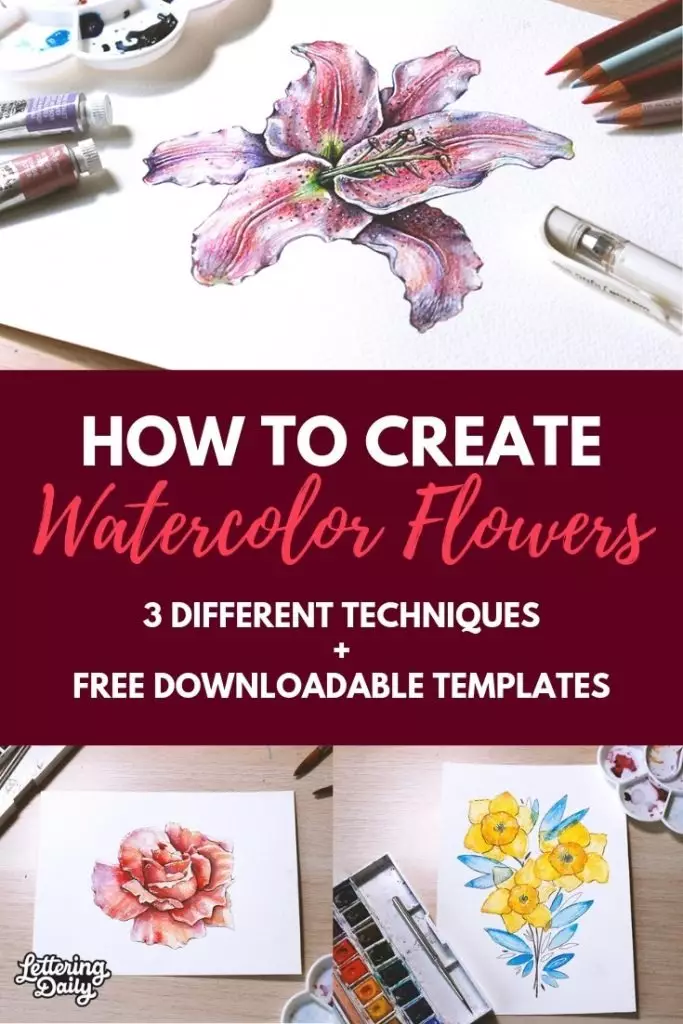
In this article, I’ll show you 3 very simple and different ways of painting watercolor flowers like a pro.
Not only that, but I’ll break down my whole creative process for you, from beginning to end.
Before I show you the 3 different techniques, I’ll show you how to draw any kind of flower you want – even if you’re a complete beginner!
However, if you’re not that much into the drawing part… I’ve got you covered!
At the end of this tutorial, you’ll find a FREEBIE I’ve prepared for you of 4 ready to print flower templates and more!
The only thing you’ll need to do is print the flowers, transfer them into your watercolour paper with the techniques I’ll share in this article, whip out your watercolours and have some fun!
- Tools Needed
- How to draw any flower – step by step
- How to transfer your drawing to the watercolour paper
- Find every colour in your reference
- Short talk about colour theory
- Watercolor beginner essentials to keep in mind
- 3 Different step by step ways to paint watercolor flowers –
Method 1 –
Watercolour + Coloured Pencil Flowers
Method 2 –
Watercolour + Ink Flowers
Method 3 –
Watercolour Layered Flowers
- Brand recommendations
- Final words and your FREEBIE
Watercolour is an easy medium to use, it’s fluid and organic, however it can also be unpredictable and unforgiving.
With these tips you’ll be able to create 3 very distinct flower illustrations.
The idea is that you find the technique with which you feel more comfortable with and feel free to experiment with it.
This is why my main advice will be:
Take your sweet time and enjoy!
What tools do you need for this tutorial –
To get started, this is what you will need:
- Pencil
- Erasable color (Optional)
- Kneaded Eraser / Eraser
- Tape or Washi Tape (Optional)
- Light Box (Optional)
- Watercolor Paper
- Watercolors
- Two Water Cups
- Waterproof Pen
- Brushes
- Cloth
- Colored Pencils
- White Gel Pen or Gouache
- Mixing Palette

You can use any brand you want, but I’ll drop some of my personal recommendations at the end of this post!
How to draw any flower – step by step
Everything that we see around us can be translated into geometric shapes and angles.
Before we get to the step by step process, let me give you a quick example of what I mean.
I’ll use the iPad for this example because it’s easier to explain the basic theory.
Just stare at this picture a little longer and I’ll help you out.

First, let’s mark the circle that contains the whole flower.

After that, another circle for where the stem meets the petals.
Now, from the center, the angles of the petals and then, their basic shapes.
The same for the stem.


And with a bit more detail, you’ll find your flower.

This theory can be applied on any type of flower you want to draw.
Just get a good reference picture and focus on the geometric shapes you find on it.
You can check websites like Unsplash or Pexels to find great reference photos!
That being said, let’s start the tutorial.
I recommend you use a cheap piece of paper for this part.
Graphite and watercolor don’t necessarily get along very well and the eraser could rip your precious watercolor paper.
But don’t worry, as soon as you’re done with the drawing, I’ll show you how to transfer it to the watercolor paper for the final piece.
Ok, here we go!
STEP 1
I’ll use this flower as my reference.

Let’s start with the circle that contains the whole flower.

This will be the space for your drawing, so try to keep all the lines within this space.
STEP 2
Now, let’s add a circle for where the petals and the stem meet.
STEP 3
Let’s mark the angles of the petals and find their basic shapes.

A tip for this part is to check the negative space in the reference photo to see if it matches your drawing, and adjust if it doesn’t.

STEP 4
Softly, start erasing the guidelines and cleaning up the drawing.

I recommend a kneaded eraser because it picks up graphite without damaging your paper.

Spend some time looking at the reference and add more details.

PRO TIP
Add some extra imperfections and folds, this will make the flower seem more realistic!

I tend to not follow the reference religiously, and I believe this is the right attitude when drawing.
I use the reference only to get the basic idea and build it up from there.
Just enjoy yourself, it really doesn’t matter if it’s not identical to the reference.
You can apply this to any flower you like, you just need to spend some time looking at the reference, find the shapes and just have fun with it.
Practice will make it a whole lot easier!
Once the basic drawing is done, let’s mark the shadows, highlights and other important details.
I always like doing this because having the shadows and highlights planned out makes it easier to paint once we get to the watercolor.
I usually start with the shadows. Mark them out and add a bit of value with your pencil.
Add any detail you see in the reference, like the freckles and lines on the petals.
Next, softly mark the highlights.
Spend some time here, have fun with it until you’re satisfied.

And when you’re done, your reference drawing is ready to transfer!
(from sketching paper to watercolor paper)

How to transfer your sketch to watercolor paper
If you have a Lightbox, simply place the reference drawing on the back of your watercolor paper with washi tape.
You could use any sort of tape, but the washi tape is the best because it is more gentle on the paper and it will not rip the paper when you try to take it off.

You’ll easily know which side is the back of the paper because usually the front of it has a bit of texture.

First we are going to secure the reference image to the backside of the watercolor paper (with the washi tape), and then we are going to flip it over – so the reference image is at the bottom and the watercolor paper is on the top.
Once you have the reference drawing where you want it, just turn on the lightbox and trace away!

PRO TIP
I usually use an erasable color for this part because it makes the lines less noticeable after you add the watercolor.
How to transfer your drawing if you don’t have a lightbox.
1. The Window Method
Before I had a lightbox, I used to place my drawing in a sunny window.
The light would go through the paper and I would rock the ¨very professional¨ window lightbox.

However, after some time, this becomes very uncomfortable… So, if you don’t have a lightbox, here’s what you can do.
2. Graphite pencil transfer method
Go over the lines of your reference drawing with a graphite pencil so they become darker.

Once it looks like this, place it on top of the watercolor paper with washi tape.
It’s important that you place the drawing facing the top part of the watercolor paper.
Once that’s done, go with your pencil over the back of the paper.

And like magic it will transfer to your watercolor paper!

Find the colors
Get your reference photo and stare into it’s soul!

Start marking all the different colors you can find.
The obvious and the not so obvious ones.
Treat it like a game, find ALL colors you can find in the reference.
Note – I’ll do this with the iPad to quickly show you how many different colors you can find in your reference image.

This will make your illustration way more interesting to watch and, quite frankly, more fun to work with.
Color theory (the basics)
One of the best tips I’ve ever gotten for watercolors was:
Never use black.
Ok, sometimes you can use it to add some final details.
But I always try to avoid it.
If I want to make a color darker and add shadows, what I do instead is use the complementary color.
SAY WHAT?
The complementary color.
This means the color that’s right in front of the color you want to use in the color wheel.
Complementary colors always contain one cool and one warm hue.
They neutralize each other when mixed together, making them perfect to create interesting shadows filled with contrast.
Creating an illustration that’s more appealing to the eye.
If you want to know more about color theory you can check this article.
Watercolor beginner essentials to keep in mind
Before we jump right to the watercolor part, i need to share a few watercolor essentials for beginners with little or no experience with watercolors.
If you already have experience with watercolors, you can skip this step.
1. Don’t use paper that’s not for watercolor.
Watercolor is one of those mediums in which the type of paper you use really makes a difference.
2. Don’t make the line work to dark.
When you transfer your illustration, it’s best to do it really light or with a colored pencil.

When you add water to graphite it creates a greyish mess and it can ruin your illustration.
3. Don’t go crazy with the water.
Even if you have a thick watercolor paper, try to go easy with the water you use for each layer.
If you don’t, your paper might get ripped and overworked.

4. Test the color before using it.
It’s always a good idea to have a small piece of paper close by and test the color before adding them to your art.

5. Work from light to dark.
Build the colors in layers, from the lightest tone to the final piece. You can go from light to dark, but not the other way around.
6. Clean your water cup while you’re working!
When the water in your cup gets dirty replace it with clean water.
7. Be patient!
Allow your paper to dry before adding more layers and details.
Patience can make or break your illustration.
These are really the essentials for watercolors, and i will also sprinkle more helpful tips along the process.
3 Different step by step ways to paint watercolor flowers
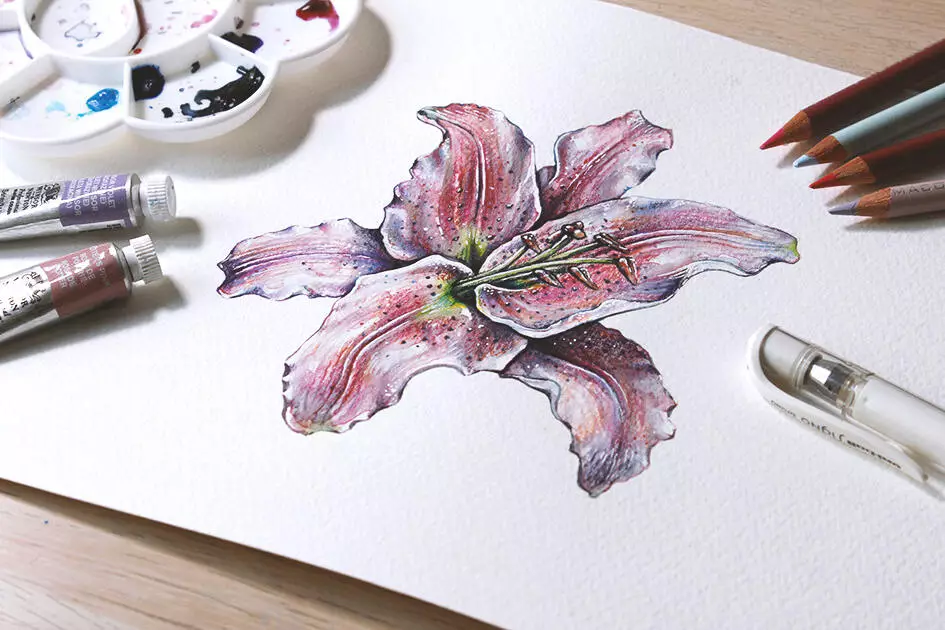
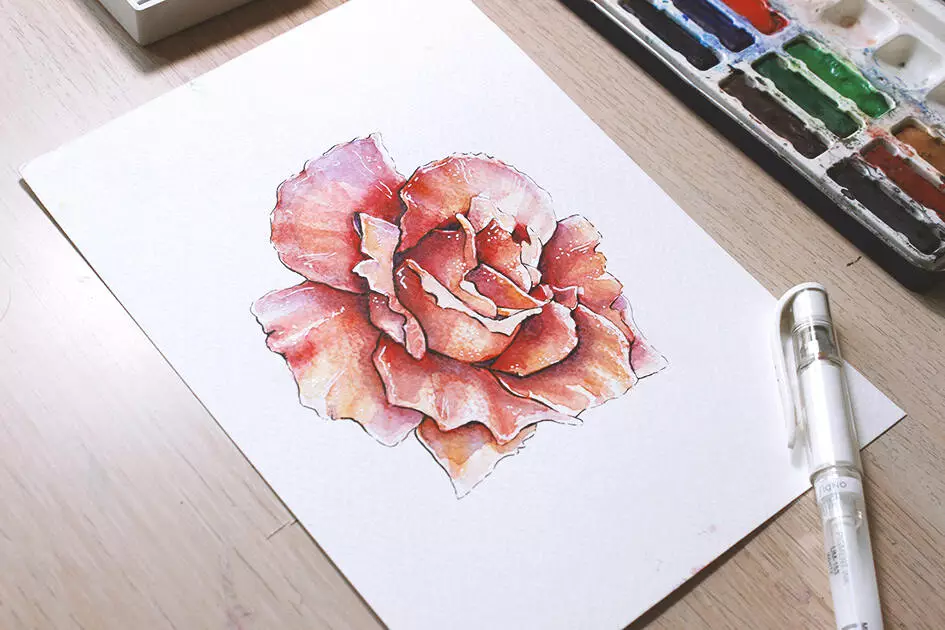
Method 1 – Watercolor + Colored Pencil Flowers
This is my personal favorite way to use watercolors!
Let’s jump right in!
STEP 1

We’ll start with the wet-on-wet technique.
This is not a french-kiss technique.
It’s when you add water to the area you want to work with before adding the pigment.
This is a perfect way to start layering the colors while getting smooth looks with no hard edges.
It’s always a good idea to mix the colors you will need before starting to paint.
A common mistake when starting out is to mix too little of the color you will use.
It’s always better to mix too much than too little since it’s a bit hard to perfectly match the color you had before.
Have an extra piece of paper handy so you can test the colors and find exactly the ones you want.
Keep in mind that watercolor is more saturated when it’s wet in comparison to when it dries out.
…
So, start by adding water into the areas you want to start working with.

I recommend working on one area at the time, this will allow you to work faster and will save you most of the drying times!

Remember to use a separate piece of paper to test the color before you use them in your artwork.
Go easy with it, the paper can only take a certain amount of water and pigment before it starts to get damaged… so slow your horses.
Use a fine layer of watercolor to match the lightest color in your flower.
It’s very important that you lay down the colors slowly and in layers.
This will allow more correction and makes the whole process more forgiving.
PRO TIP
Another really good tip I’ve gotten was:
Preserve the light areas!

If any pigment falls into the white space you won’t be able to go back to white once it gets dry.
When painting with watercolors, once you go dark, you never go back.
However, If you made a mistake and the area is still wet, you can lift up the pigment with a bit more water and a cloth or paper towel.
STEP 2
Once the area you want to work with is dry, it’s time to build up the mid-tones.
A way of knowing if it’s dry is looking at your painting from the side.
Since water reflects more light than dry paper, it will be a bit shiny if it’s still a bit wet.
Remember to be patient. It will pay off!
So add a second and third layer if necessary, until you are happy with the mid-tones.

A tip here, watercolor can be easily overworked, so it really doesn’t need to be the final hue of the mid-tone.
You can always go back to correct the tones once you’re closer to the end of the illustration.
STEP 3

Once you have all the basic colors layered down, it’s time to move to the wet-on-dry technique.
This means that you add the watercolor without first adding water to the paper.
Wet-on-dry is a great technique to get details and the final layers down because it gives you more control over where the pigment goes.
For this technique it’s very important that the surface you’re working with is dry.
If it’s even a bit moist, the paint won’t layer properly and will bleed out instead, which will not allow you to create crisp details.
Continue adding layers of color and detail until you’re satisfied with how it looks.

PRO TIP
As soon as watercolor gets dry, it will make a mark.
Some people, me included, really like these accidental shapes.
But if you’re not one of those, a good way to avoid this is by working slow and don’t allowing the paper to get dry until you’re happy with where every color is.
If it already happened, embrace the mistakes and make them work… those accidents can bring a lot of expression to your art!
STEP 4
Let’s darken the shadows a bit more.
The more contrast there is between the light, medium and dark spaces of your piece, the more realistic it will look.
My go-to color for shadows is indigo blue mixed with the complementary carmine red.
Why?
Because many shadows have a natural blue tone to them.
I also pay close attention to the colors I’m working with and make shadow colors with their complementaries.
Keep on layering the shadows until you’re happy with how it looks.

Remember not to overwork it… We’ll go over them this the colored pencils at the end to pop’em out!
STEP 5
Bring out the colored pencils and start adding all the colors and details you can find in your reference photo.

Darken the shadows with the same color method you used before.
Really have a good time with this part!

PRO TIP
If your shadows aren’t getting dark enough, a great way to get to an almost black color is to mix mustard yellow, dark green, indigo blue and carmine red.
This creates a darker shadow without toning down your drawing.
If you want, after you do this you can carefully add a tiny bit of black to the darkest darks.

STEP 6
With the white gel pen, add some extra light points and extra details to make your drawing pop!
And you’re all set with this technique 😀

METHOD 2 – Watercolor + Ink
This technique will be very similar to the previous one, the only difference is that we will ink the flower before adding any watercolour.
To do this, you’ll need a waterproof pen.
I can’t address this enough… it needs to be a waterproof pen, so, really check if the pen you want to use, has this feature.
If you’re not sure, you can make a doodle in an extra piece of paper and run some water over it.
If it stays put, you’re good to go!

Once that’s settled, let’s get this ball rolling.
STEP 1
We’ll start by inking the flower drawing you already transferred to the watercolor paper.
A way to make the inking really interesting is to leave the lines opened.

Avoid making a full line.
Leave some white spaces, specially where the flower is catching the light.

Don’t rush with the lines and wait for the ink to dry a bit before moving to the next step.
STEP 2
Just like before, we’ll start with a wet-on-wet technique.
Add a bit of water to the area you want to work with and start layering the lightest color of your flower.

Remember to test the color before using it and preserving the white spaces.
PRO TIP
If your water is starting to look like mud, maybe it’s time to change it and get clear water.
I usually do this several times while using watercolors.
Another thing… try not to keep your tea or coffee cup next to the water you’re using to paint…
Once you’re in the painting matrix, it can happen that you ¨clean¨ your brush and end up with coffee all over your painting…
Or even worse… you end up drinking from the wrong cup.
It happened to a friend of mine…
…Moving on
STEP 3
When you nailed the base colors, it’s time to go for the mid-tones of the painting.

Once the previous layers are dry, add more values to the medium tones.
Keep adding layers of color until you feel happy with how it’s looking.

Remember to not go too dark in this step.
STEP 4
After the base colors and tones are done and dry, time to shift to the wet-on-dry technique and start adding more details and the final colour layers.

Remember to let everything dry before adding the details so everything looks crisp and there’s no accidental bleeding of watercolor.

Keep adding layers and details until you’re satisfied.
STEP 5
Use the same wet-on-dry technique to darken the shadows and make your illustration pop a bit more.

If you want, you can also add some final touches with colored pencil just like we did before.

STEP 6
Bring out the waterproof pen once more.
If you have a thicker one, better. If not, use the same one you used before.
With the waterproof pen, go over the lines that are in the dark parts of the painting and make them a bit thicker.
This will add a lot of value to the piece.

STEP 7
Add some final light and details with the white gel pen and appreciate your masterpiece.

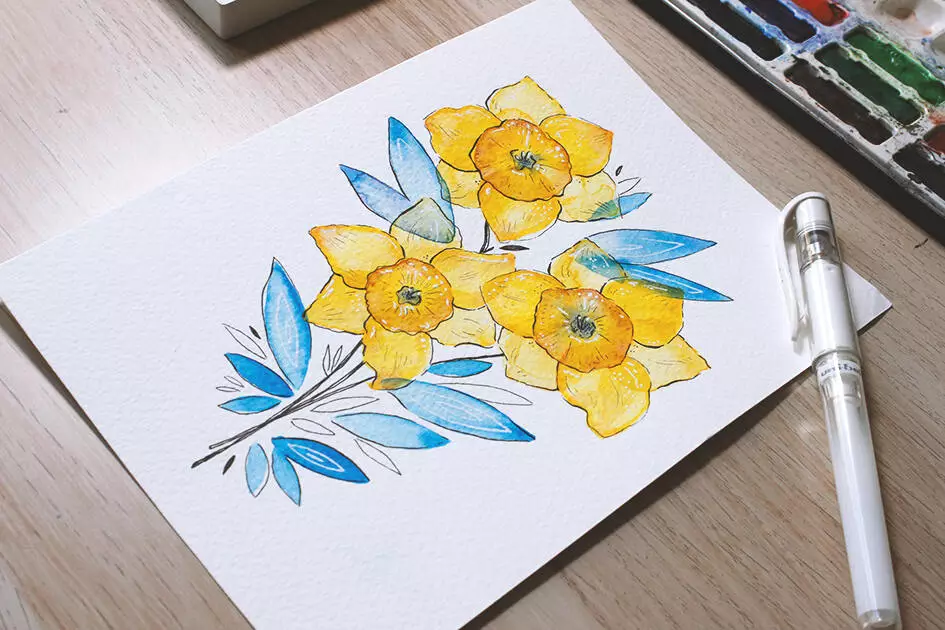
Method 3 – Layered flower
Now, this technique is a lot more free-style that the other two and it’s a great, fast and very easy way to get interesting illustrations!
Let’s dive in.
STEP 1
With your traced drawing, add water to the petals that are further back.
Add a pop of color to those areas using the wet-on-wet technique.

Try adding more than one color to keep it interesting.
With this technique, you can use the colors you want, feel free to experiment color combinations.
Let your creativity flow and just enjoy this moment.
STEP 2
Once the first petals are completely dry, add the second layer of petals using the same technique.

Keep doing this until the base of your drawing in done, always waiting for the area to dry before adding more watercolor.
Once you have the base of the flower done, let’s move to details.
For this step I picked a blue that acts as a complementary to the yellow of the flowers.
Start with a dot in the middle of the flower to mark a shadow.

You can use the same blue to add some foliage and create a more interesting illustration.

STEP 3
When all the watercolor is dry, use your waterproof pen to add some details and the stem.

STEP 4
To finish your illustration, you can use the white gel pen to add some final touches.
Don’t be scared to mix and match all the flowers you want.
And there you have your finished piece!

A good tip to get a successful illustration right away is to pick a good color palette before working with this style.
If you’re going to work with color, it’s always a good idea to learn more about the color wheel and some trust-worthy color combinations.
BRAND RECOMMENDATIONS
When using watercolor it’s important to test out different material to see which one work best for you.
You really don’t need to use any specific brands.
However, here are some of my favorite materials and brands to use:
Watercolor –
Watercolor paper –
FINAL WORDS + YOUR FREEBIE
We’ve reached the end, thank you for sticking by 😉
I hope you’ve enjoyed the tutorial and learned some new tips!
But now you’re probably thinking… Where’s my free stuff???
Don’t worry.
As I promised, I’ve prepared this FREEBIE for you! – im giving 4 different flowers
Get your freebie by clicking on the button below –
Here’s what you’ll get –

And here’s one of the ways you can use it –

But that’s not all you can do with it.
The files are ready to drag and drop into your own art and personal projects.

You can even use the flowers to create a whole artwork in your computer, print it out and transfer it into your watercolor paper.
That’s exactly what I did for the cover of this article.

If you would like to check out more illustrations that are ready to use and print, you can check out my shop:
https://creativemarket.com/RiverosArt
Well, that’s it for me guys!
Hope you enjoy your Freebie and thank you for joining in! 🙂

Stay updated with my tutorials and get instant access to the Lettering Crate –
A growing library of free lettering & calligraphy resources that includes –
Pin me!
About the author

I’m a freelance illustrator and graphic designer since 2015, but I’ve been drawing for as long as I can remember.
After I finished the university as a Graphic Designer, I moved to Barcelona to study a Master in Illustration at BAU University.
Since then I’ve been drawing, designing and learning all over the world!
I love sharing tips and tricks that I’ve picked up during the years and my studies to make your drawing experiences easier!


Thank you, this is so useful and informative. I love the the steps and ideas you present. The color choices are beautiful, and I like how you list all the tools. love your work thank you
Jane
Well done! Glad to meet you, I will enjoy doing my best along with your tutorial! Keep up the great work!
Thanks for doing it! Very good job. Congrats from Brazil.
Thank you so much Milza! That means a lot!
Hey Claudia, thanks for this really cool tutorial, I really like your style! I was curious about the Sakura paint, did you pick this one over other brands like W&N, or Schmincke for exemple? Is Sakura a student grade or professional grade?
Thank you so much Lesly! It makes me happy to hear you liked it.
About the watercolors, my top choice will always be Winsor & Newton because of the pigmentation and quality of the paint, however these watercolors can be a bit pricy.
One of my other options would be the Sakura Paint, the pigmentation is strong and the color assortment is on point.
I would call it a medium grade and would still prefer to use Winsor & Newton or Schmincke any day of the week 😉
It’s always important to keep in mind that watercolor is a media in which the quality of the paper and the paint will really affect your work.
This is an awesome and very thorough post on creating florals! Well done!
Thank you, Lauren! A lot of time and effort was invested in this tutorial and I’m really happy to hear that you see the value in it 🙂 Be sure to grab your freebies 🙂
Merci de nous partager toutes ces techniques.
Thank you!