In today’s article, I am going to show you a few tips & tricks on how you can save up some money when practicing lettering and calligraphy.
A few years ago (as a broke student) i was in a position where even 10-20$ would make a difference in my budget, and this is exactly what motivated me to create this post.
In this post, I’m going to show you that even if you are on a budget you can still practice the art of hand lettering and/or calligraphy.
In case YOU have some suggestions or ideas that would fit into this list, feel free to reach out and we can always update the list – the more the merrier right?
Let’s have a quick overview of the things that you will be learning in this article –
- DIY Tracing paper
- DIY Parallel pen
- Refilling your pens and markers
- Pencil calligraphy
- Other AFFORDABLE supplies
Keep in mind that these tips and tricks can’t really compare with the original tools that you can buy – at least they are cheaper and some of them even totally free!
Let’s get down to the list!
DIY TRACING PAPER
In some of our previous posts, we already discussed about the importance of tracing paper especially when it comes to hand lettering.
For those who don’t know what tracing paper is, it’s basically thinner (transparent) paper that helps you refine your sketches.
Chandan wrote down an amazing step by step tutorial where he lays down his whole process, and tracing paper plays a vital role in the procedure.

Tracing paper itself isn’t that expensive, you can get 100 A4 sheets for about 7$ on Amazon + delivery + waiting etc.
Lucky for you i found a waaay cheaper alternative that anyone can get at almost any supermarket –
Ladies and gentlemen, it is my great honor to present you –
The baking paper!
Yup, the good old baking paper is a great (inexpensive) alternative for tracing paper.

In my local supermarket they sell 30 sheets of baking paper for about 2$.
The size of each sheet is a bit bigger than a A3 paper sheet.
This means that you can cut and divide each sheet of the baking paper – assuming that you are not creating super big lettering artwork.
I would say that the only downside of this alternative is that it’s not very suitable for markers as much as it is for pencils.

DIY PARALLEL PEN
In case you are interested to practice wide nib calligraphy scripts, the parallel pen is the best tool that you can start with –
Unfortunately that costs money!!
No worries, there is a super easy and awesome alternative to this!
Here is what you will need for the DIY parallel pen –
- 2 pencils
- 2 rubbers or some tape
- A small piece of paper
Note* – im not really sure who came up with this idea, but i picked it up from the talented Erwin, from one of his Instagram posts a while ago.

Simply take the two pencils and secure them next to each other by using either the tape or 2 rubbers.
You can use the small piece of paper to increase the space between the two pencil tips which will give you a broader stroke.
If you place the small (folded) piece of paper closer to the tips it will give you a broader line, while putting the paper at the end will give you a more narrow width.
Check out this quick video tutorial on how to create it!
You can do this technique with pencils, pens or anything that will leave a trace on paper.
Here is some quick blackletter calligraphy that i did with my brand new (cheap) tool –

REFILLING YOUR PENS AND MARKERS
Surprise!
Refilling your pens and markers is totally something you can do at home.
This means that you won’t have to re-stock on your pen supply every time they run out of ink!
You can pretty much refill any marker that you have, and today I’m going to show you how to refill the Sakura Microns and the Tombow Dual brush pen.

Refilling the Sakura Micron pens
In order to refill your Sakura Micron fine-liners you will need a couple of things, let’s check it out.
- Empty microns
- Dropper / eyedropper
- Ink
- A small knife
- Paper towels in order to avoid any mess
Note*– you can get an eyedropper in almost every drug store, and they are extremely cheap and helpful – i got mine for less than 1$
In case you can’t get one you can always make paper/plastic funnel but grab some extra paper towels because things will get messy!

Let’s get started!
Step 1 – With the small knife (or anything small and flat) pop off the top of the pen


Step 2 – Take your dropper and grab some ink from the bottle

Step 3 – Carefully drop the ink inside of the pen

Step 4 – Place the tip of the pen back inside.

That’s it! Simple as that!
You will just need to hold your pen vertically for a little while in order for the ink to be absorbed by the nib and to get the proper ink-flow.
Microns and other fine-liners are small pens that require very little ink, and with just a few drops you can keep using your microns over and over again!
Ok, let’s move on to the brush pens!
Refilling the Tombow Dual Brush Pen (and other brush pens)
Here im going to show you how to revive your dead Tombow brush pens, however, keep in mind that if you are not using water-based ink you won’t really be able to blend them with different colors like the new ones.
In my opinion, these refilled markers are great for practicing, meaning that you can use the new ones for final pieces.
A great way to save money on the long run!
The process is very simple and actually quite similar to the previous one.
I want to refill this dying red Tombow brush pen so i decided to use a similar shade of red for it.(Burgundy)
If you don’ t have the same or similar color, that’s totally fine – just use whatever you have.

Here is what we are going to need –

Step 1 – Take some toilet paper (or a paper towel) and start gently pulling out the nib of the pen.


Step 2 – Grab your eye-dropper and take some ink.

Step 3 – Take you empty brush pen and carefully start squeezing the ink inside of the pen.
The Tombow brush pens (as well as other brush pens) are a bit bigger than the Sakura microns, meaning that they require more ink.

Step 4 – Take the nib of the pen (with the paper towel) and gently slide it back inside in the pen, like so –


That’s it!
Easy right?
It will take a bit longer for the brush nib to absorb the ink.
In some cases i had to leave it standing vertically overnight, however with this one it was much quicker (almost instantly)
Check it out –

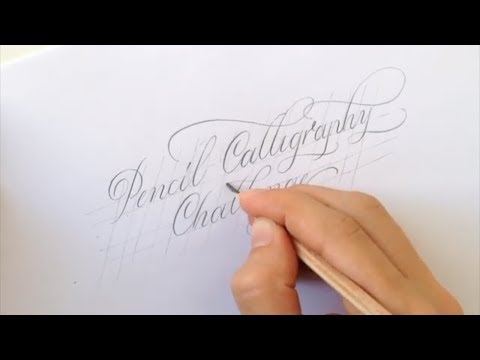
CALLIGRAPHY WITH A PENCIL
Beginners usually start off their calligraphy journey buy purchasing either a pack of brush pens or a dip pen set (depending on the style they want to start with)
However, there is an awesome and cheap alternative to all that!
The good old pencil is probably the single best tool – like EVER!
You can sketch, fill, outline, delete it, repeat it and yes, you can also practice calligraphy with it!

There different kinds of pencils that can create different kind of marks on the paper – hence different pencils will give you a different kind of stroke thickness.
We already talked about the different kinds of pencils in our ultimate hand lettering guide for beginners, but since you are already here I’m just going to make a quick sum up.
The type of pencil is determined by the lead/graphite. (the leads are the black thing surrounded by the wood)
We have hard leads (marked with the letter H) and soft leads (marked with the letter B – for black).
On top of that basic division there is also a numeric scale that determines how hard or soft a lead inside of a pencil is, for example –
A 6H is harder than a 2H while a 6B is darker than a 2B etc.
Check out this AWESOME info-graphic created by jetpens.com

Pencil calligraphy basically works like any other kind of calligraphy – the key is in the pressure which creates the thick and thins.
You can do calligraphy with any kind of pencil but you just keep in mind that a harder pencil (H) will leave a lighter and not that thick stroke compared to softer (B) pencil.
Check out this inspiring pencil calligraphy compilation from Calligraphy Masters –
OTHER AFFORDABLE SUPPLIES
Hand lettering and calligraphy are not that expensive.
In other words you don’t need to spend a whole lot in order to get started.
Although there are some nifty tips and tricks that you can do, the truth is that you will need to spend some money on some supplies.
Here is a quick list of some affordable lettering/calligraphy tools –
Brush pens and markers
- Crayola markers
- Pentel fude touch
- Tombow fudenosuke (hard/soft tip)
- Zebra Fude brush pen
- Kuretake Bimoji brush pen
- Sakura Pigma Micron (pack of 4)
- Sharpie (black, fine point)
- Sakura Gelly Roll
- Kuretake Fude brush pen
- Water brush pens + watercolors
Paper
In case you don’t know it yet, the type of paper you use is very important.
If you don’t use proper paper you risk getting ink bleeds, frayed tips etc.
All this can essentially cost you more money, so it’s best to get the proper paper.
There are a ton of good brands for paper such as Canson, Rhodia etc. However these types of paper are usually more expensive.
Don’t worry there is an alternative to this matter!
The HP Premium 32 is an awesome alternative to the branded notebooks – also great for printing practice sheets!!

FINAL WORDS
I hope you managed to find some helpful tips in this post and i also hope that you will be able to save up some money along the way!
A very important thing to remember about both lettering and calligraphy is that your lettering/calligraphy won’t magically improve with a better, more expensive tool.
The more you practice the better you will become!
Be sure to join our official Facebook group, where you can share your work, ask questions, network with other lettering/calligraphy artists and much more!
Until the next time,
Stay AWESOME!

Stay updated with my tutorials and get instant access to the Lettering Crate –
A growing library of free lettering & calligraphy resources that includes –
Pin me!

About the author

Hey, I’m Max. I’ve been drawing and messing around with letters since 2011. I don’t have a formal art degree—my background is actually in the kitchen as a former chef and on the streets painting graffiti with my friends. Over the last decade, through a ton of trial and error, I somehow turned that obsession into a full-time gig. These days, I design custom logotypes for global brands and paint large-scale murals. I started Lettering Daily just to create the kind of honest, no-BS tutorials I wish I’d had when I was starting out. Stick around, and let’s draw some letters.

its a really nice article but.. the supplies you said were cheap are expensive in my country.
Sorry to hear that :/ Which supplies are you referring to exactly? Are you looking also online?
Hi! I’m trying to revive my tombow brush pens and none of the brush nibs will STAY in the pen when I put them back- what can I do?
Hmmm sounds like your tips are completely frayed. Perhaps it would be best if you shoot me a video and send it to my email address – [email protected]
I am afraid that without seeing exactly what’s going on I cannot really help :/
going to try the 2x pencils tip
also can i use baking paper as a practise paper for calligraphy using inks? its all i have at home besides run if the mill inkjet paper atm
Great to hear that! As for the baking paper, im not really sure. I’ve only tried it with a pencil and some brush pens.
With a pencil and sketching, it works like a charm, but with a brush pen, I didn’t have much success. If you try it, please let me know how it turns out 😀
This is so helpful, I’m a beginner in trying calligraphy lettering and I worried if I’ll just throw my tombow pens, it’s a good thing that we can still refill it. ? If your don’t mind, in a long run, is your refilled tombow brush pens are still workable like a brand new brush pens? Thank you!
Thank you for the kind words! I’ve been refilling my Tombows for the last 6 months and it works like a charm. Just be sure to use smooth bleedproof paper to avoid fraying the tips and i think you will be good to go for a long time 🙂
Thank you for the great effort you have once again given !!!! is there also ink in other colors for the Tombows except in black only?
I’m looking forward to your answer! Thank you in advance! best regards
Hey Marie! You are very welcome 🙂
Absolutely you can use any color that you have. Ecoline has a nice set of ink colors but i think you can find even cheaper alternatives 🙂