What’s the quickest way to make your lettering look more impressive?
The answer: Flourishing!
Adding flourishes to your lettering can completely transform the look of the piece.
It can take a piece from “basic” to eye-catching with only a few extra curves and loops.
For this step by step beginners tutorial we’ve teamed up with the talented calligraphy duo – Loveleigh Loops!
Here is a sum up of what you will be learning in this tutorial –
- What is Flourishing?
- Flourishing A Word
- The 5 Best Spots to Flourish
- How to Create Beautiful Flourishes
- The magic formula
- Drills and Rules
- Flourishing Drills
- 3 Rules of Flourishing
- Putting it into Practice
- Upper loop flourish examples
- Lower loop flourish examples
- T-crossbar flourish examples
- End of the word flourish examples
- Under the word flourish examples
- Flourish Variations
- 25 ways to flourish the letter y
- Entry and Exit Swashes
- Free downloadable practice sheets!
- Takeaways
- Free one-week flourishing online course
If you’re just getting into calligraphy, you might find my complete learning hub helpful — it covers everything from styles to practice tips.
Without any further ado let’s get down to the tutorial!
What is calligraphy flourishing?
Flourishing is another word for embellishing.
Adding embellishments to the letters can make a word look more fancy, decorative, and noticeable.
Here are a few examples:
Top: not flourished, Bottom: flourished

Left: not flourished, Right: flourished

Flourishes can range from simple to complex.
Simple ones are made of basic curves and loops, while complex flourishes have curves that cross over themselves multiple times and can even have small loops inside larger ones.

You can flourish a single word or an entire layout to interlock the words together.
For now, we will focus on flourishing a single word.
Before you start practicing calligraphy flourishing with a brush pen or a pointed nib, you could actually try it with just a pencil.
Flourishing a word
Let’s see exactly how this works.
Here’s the word “flourishing” written in its most basic form:

And here is the same word written with embellishments:

The purple lines are extensions off the letter base.
They add style to the letters and fill up space around the word.
So now you might be wondering, how do I make flourishes?
And how do I know where to put them?
Let’s start with the “where”.
The 5 Best Spots to Flourish
Some areas within a word are better for flourishing than others.
Why?
Because adding a flourish extends a letter beyond where it normally “lives”, and you want to make sure legibility isn’t compromised.
Here are the 5 best spots to add flourishes to your lettering:
- Upper loops
- Lower loops
- T-crossbars
- End of the word
- Under the word

And here’s what it looks like when you flourish all 5 spots:

Adding flourishes to these 5 places (rather than random spots in the letters) helps make sure the word remains legible.
You may gravitate towards 2 or 3 of these spots, so don’t feel like you have to use them all!
In fact, a word might not even have a loop or t-crossbar which would take away that opportunity.
But if you’re stuck, think about these 5 places to get you started.
How to Create Beautiful Flourishes
Now that you know where to add flourishes, the next question to answer is how do you make them?
And even more importantly, how do you make them look beautiful?

Let’s take a closer look.
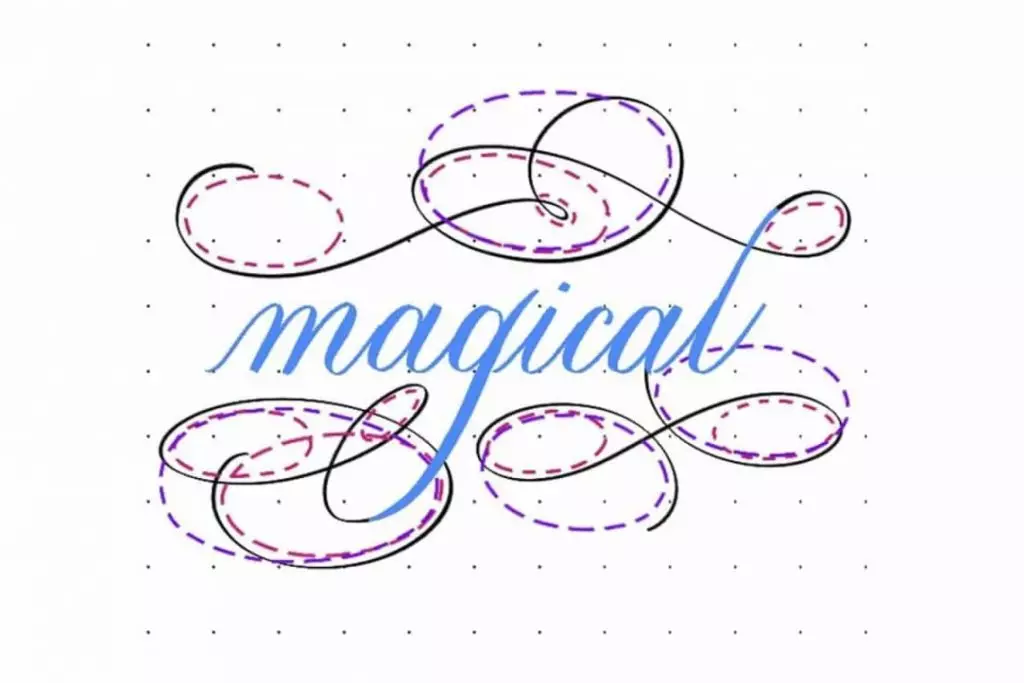
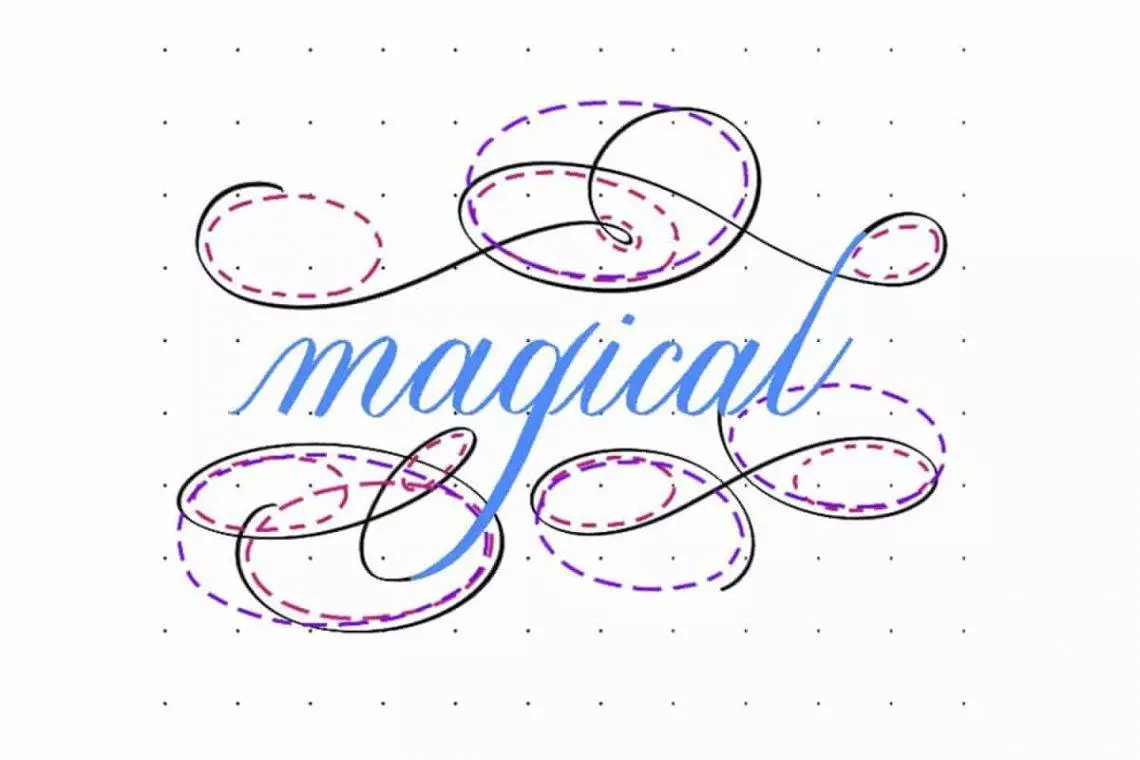
In the image below, the base letterforms are highlighted in blue:

So that means everything leftover (not in blue) makes up the flourishes.
Here are the isolated flourishes:

What do you notice about these shapes?
The magic formula
All of the lines are smoothly curved and based on an oval shape.
Oval-based shapes makes the flourishes appear graceful and consistent rather than choppy, irregular, or random.
You can fit small ovals within the loops and curves:

And there are also larger, overarching oval shapes:

The trick is to think about tracing, or “wrapping around”, an oval as you make a flourish.
To put it all together, the blue represents the base letter forms, pink ovals are small ovals within the loops and curves, and purple ovals are overarching shapes:

When you break it down that way, flourishing seems more manageable!
The rules and drills for calligraphy flourishing
The drills –
Before you jump in to flourishing letters, it’ll help to start with some drills.
The first set of drills will get you used to creating oval shapes from all directions and orientations.
Use a pencil and do them as many times as you can until you feel comfortable!

In addition to complete ovals, the c-shape and s-shape are also very commonly found in flourishing.
In fact, they are based on the oval!
The c-shape is just half of an oval, and the s-shape is formed by two ovals next to each other.
These drills will get you comfortable making the c- and s-shapes:

When you’re able to make smooth, consistent ovals, c-shapes, and s-shapes on their own, you’ll feel much more confident using them in your flourishes.
3 Rules for calligraphy flourishing
Here are 3 important rules to keep in mind:
- To reiterate, flourishes are based on ovals:

2. Lines should cross at (approximately) 90 degree angles:

3. Do not cross two thick lines.
You can cross thin-thin and thin-thick:

If you keep your flourishes based on the oval shape, cross at 90 degrees, and avoid crossing two thick lines, you’re setting yourself up for successful flourishing!
Putting it into Practice
Let’s go back to the top 5 spots to add flourishes to your letters:
- Upper loops
- Lower loops
- T-crossbars
- End of the word
- Under the word
Now we’ll look at some examples for each of the 5 types. Remember, the flourish acts as an extension of the base letterform.
Pay attention to the 3 rules you learned above (oval shapes, 90-degree angles, and crossing thin/thick lines) as you look at the examples.
Upper loop flourish examples:
On the left is a basic “h”, followed by 4 flourished h variations:

You can use these upper loop flourishes for any letter in this group: b, d, f, h, k, and l.
Lower loop flourish examples:
An un-flourished “g”, followed by 4 flourished g’s:

The flourishes used in the “g” can also be used on the descending loops of: f, j, p, q, y, and z.
T-crossbar flourish examples:
A standard lowercase “t” is crossed with a straight line. To flourish, cross the stem with a simple s-shape or extend with more curves:

Another option to flourish a t-crossbar is by combining it with a nearby “h”:

The “tail” of the h-flourish becomes the crossbar of the “t”.
End of the word flourish examples:
Here are 7 end-of-word flourishing examples shown on the letter “a”:

You can use theses shapes at the end of a word or line as long as it doesn’t interfere with the legibility.
For instance, the upper loop letters wouldn’t easily be able to use these because the flourish would run into the letter.
Under the word flourish examples:
These word flourishes work best on non-descending letters that naturally dip down at the end, like r, m, a, and n. Avoid using on letters that finish upwards to complete the letter shape, like e and c.

So now you have a toolbox of 25 different flourishes to draw from!
A word of caution:
It can be tempting to flourish every possible letter in a word.
But, it’s very important that the letters are still legible, and sometimes less is more.
Do not sacrifice legibility when adding style.
Flourish Variations
Let’s dig a little deeper on the lower loop flourish. Here are the 4 flourishes we already learned:

There are endless ways to create new flourishes by changing up the shape of these examples.
Some things you can change:
- Loop size and angle
- Size of the “tail”
- Number of intersections
- Spirals
- Adding inner loops
Now let’s put these into practice.
25 ways to flourish the letter y
Here are 25 ways to flourish the letter “y” by experimenting with the variables listed above:

You can apply the same concepts (changing up the loop size and angle, size of the “tail”, number of intersections, spirals, and adding inner loops) to other flourishes as well!
Use this as inspiration, and be creative with your own letters.
Entry and Exit Swashes
A bonus way to add flourishing to your word is by using entry and exit swashes.
This works best when you have a single word or short phrase centered on a page with room on either side.
You can add these to a plain, non-flourished word to give it some extra embellishment, or add on to a simple flourished phrase.
Here are some examples of swashes to add at the beginning and end of a line:

Here’s what the word “week” looks like with these entry and exit swashes:

FREE downloadable practice sheets for calligraphy flourishing
Drop your email below to get access to the practice sheets.

Stay updated with my tutorials and get instant access to the Lettering Crate –
A growing library of free lettering & calligraphy resources that includes –
Takeaways
Flourishing can transform a piece from “basic” to eye-catching.
It’s an easy way to add style to the letters and fill up space around the word.
As you begin this exciting journey of flourishing, remember:
- The 3 main rules of flourishes are:
- They’re based on oval shapes
- Cross lines at 90 degrees
- Do not cross two thick lines
- The 5 best spots to flourish are:
- Upper loops
- Lower loops
- Lowercase t-crossbars
- End of the word
- Under the word
- You can create endless flourishes by experimenting with loop size and angle, size of the “tail”, number of intersections, spirals, adding inner loops
A few more things to keep in mind as you continue to practice:
- The shapes should be large enough that the flourish looks intentional. A tiny loop might look like a mistake or a distraction.
- Maintain overall balance by placing flourishes evenly around the word.
- And most importantly: do not sacrifice legibility when adding style!
But wait, there is more!

Loveleigh Loops have created a free one-week online course that will take your flourishing skills to a whole new level.
The course is open to everyone no matter your skill level, so don’t dwell on this amazing offer and learn a new awesome skill!
You can join the course by clicking the button below.
Pin me!
About the author
Loveleigh Loops is an online educational resource for aspiring letterers, co-founded by twin sisters Jillian Reece and Jordan Truster. Jillian Reece is an analyst-turned-entrepreneur. She gravitates towards a modern brush calligraphy style and loves figuring out step-by-step ways to teach. Her love of art and lettering has turned into a full-time passion and there’s nothing she enjoys more than helping her students achieve their goals. Jordan Truster is an engineer-turned-creative business owner. She specializes in pointed pen, the Copperplate style, and flourishing. Her engineering background influences her approach to teaching calligraphy. She loves to break down complicated concepts into logical steps and teach students how to analyze their work. Jillian and Jordan grow up near Cleveland, Ohio and now live a few houses apart in Dayton, Ohio. They’ve built a highly engaged and supportive online community.

Your instructions are like your artwork, fantastic. Thank you.
Great site for a copperplate beginner like me. Copperplate is such a beautiful font, that draws me in constantly. My skill level improves every day with only a few, simple, yet nerve wracking issues like the pointed nib catching the paper then bouncing or ink blotching right after dipping. But, that’ll sort itself out over time. FLOURISHING…? It makes me wanna go out on a random punching spree. So frustrating. But your excerises seem to be helping. So, I thank you for this. I will DEFINITELY check out your free 1 week class in the near future. Thank you again.
Hello,
I had been tediously practicing freebies. I think I’m ready for buying the course available for flourishing. My only request is to buy the course when its at the cheapest price and learn from basic to advance. Thank you once again, looking forward to your reply. I have already bought and practiced Becca Courtice’s Modern Calligraphy course. Hope to hear from you soon.
How to do free lettering flourishing course from u r website?
Click on the link at the end of the article 🙂
Fantastic presentation with flourishing. Video presentation solved many of my problems trying to master flourishing.. Is it still available ?
Thank you, Colin. To which video are you referring?
What is the connection between this “Lettering Daily” and Loveleigh Loops? I know they have their own platform/business and never have I seen reference to this “Max” person at their site(s)!!!!!!!
Hello Xana. My name is Max and I run and manage this website and the brand known as Lettering Daily. The connection between me and Loveleigh Loops is that we are friends who met online and decided to collaborate on this (and another one) tutorial. Think of it as a guest post article. I hope this explains our connection, and if you have any other questions feel free to shoot me an email 🙂
Grateful to all the artists who take the time and effort to share free resources with those who want to learn! Thank you!
It is an informative for starter and I liked. Thanks Lot.
Glad to hear that! 🙂
Learnt a lot about flourishing.. so helpful. Thanks a lot!
Glad to hear that! 🙂
Thanks A LOT, this article is an amazing and absolute way of learning ♡
Thank you, Sarah! 🙂
Thank u, a great source to learn!
Thank you Sarah!
absolutly a way of learning, Thank you very much
Thank you, glad to hear that! 🙂
Hello! Is the free callig crate still accessible? 🙂
Hey Gen, yes it is 🙂 If you are struggling with the sign-up, be sure to send me an email. I will be happy to assist you!
thank you very much. It is very useful to me
Super glad to hear that! Thank you 🙂
Absolutely brilliant explanation of flourishing.
I will sign up for your weekly course.
Thank you.
So glad you learned a lot from this article! Enjoy the course.
Hello, would love to get more practice sheets or information. Thank you for this great explanation!
Hello! You can access the lessons at https://loveleighloops.teachable.com/p/simple-to-spectacular
Just create a free account then you can watch the videos and download the worksheets!
I cannot get into my account.
Hi Debbie! To access your Simple to Spectacular course, head to https://loveleighloops.teachable.com/ and click Log In at the top right corner. Enter the email address you used to enroll (if you need to reset your password, there’s a “Forgot Password?” link under the login button). Once you’re logged in, you’ll be able to access the lessons!
Hi other tutorials are very helpful and I love them thanks. But don’t know what happened these days I’m not getting mails from lettering daily, I have check in all folders. Can u please send me these flourishing tutorial??
TIA
Can you send me an email so we can sort this out? Thank you for the kind comment!
Thank you so much. I wanted to try flourishes… But I didn’t get any proper websites to start with the basic…. You just made it so easy and simple… thank you. 🙂
And I also started to share the link of this page with friends so that they can also start with the basics of flourishes..
Hey Kavya, thank you for your feedback – really means a lot! Im really happy to hear that you found the tutorial useful and easy to follow 🙂
amazing tips, truly. thank you!!
You are very welcome! 🙂
Respected ,
can you help me what letters in the signature I need to write calligraphically to open money through signatures. My name is Franca Lesic, and I was born on March 8, 1962.
Franca
I am not sure what are you asking me to do, can you elaborate?
just practiced all these thank you so much!!
Great to hear that Bianca!
awesome. this is the best tutorial ? thank you so much for sharing
You are super-duper welcome! 🙂
Thank you so very much for explaining this so well. I really appreciate the hard work that has gone into this.
Thank you also for making this course available for free, I can’t wait to start it!!
Thank you so much for the kind words, it really means a lot! Really glad that you liked the tutorial!
Is the free basic flourishing course available?
Absolutely! 🙂
Pingback: Attempt #1: How to flourish – Caitlin's 14 Day Project