In this tutorial, you will learn 5 different effects that you can apply to your hand lettering.
These hand lettering effects look fantastic and everyone can create them.
Just follow the step-by-step instructions.
Renee did an amazing job with this tutorial and she will be teaching you 5 different hand lettering effects:
- Water effect
- Bubble effect
- Slime effect
- Glitter effect
- Ribbon & drop shadow effect
Enjoy!
Hey everyone! @simonsaysletter here to show you 5 awesome lettering effects! I am a hospital pharmacist and lettering artist living in Cleveland, Ohio.
About a year ago, I started hand lettering as a way to relax at the end of the day. I never thought it would have such a big impact on my life, but I’m glad it did.
What I like most about lettering effects is it is something that is unique and it adds a level of interest to the piece. You have to take materials that already exists in the world and imagine what they would look like in 3D or as a letterform.
You will learn how to create a water effect, soap bubble letters, the illusion of glitter, a slime effect, and ribbon letters with a drop shadow.
Want to know the best part?
Anyone can do this! I do not have any formal training in art or graphic design. Everything I have done is purely self-taught from experimentation and inspired by other artists.
GETTING STARTED
Some simple concepts to understand before you get started:
Highlights and shadows
Highlights are white areas where the light is reflecting off an object.
It’s brightest where it’s closest to the light source.
The white areas will fade to the mid-tones or the true color of the object.
The core shadow or shadow is a dark area furthest from the light source, where no light hits the object.
The cast shadow is where the object creates a shadow on the work surface.
Understand the basics of shading with a pencil and going from dark to light with smooth transitions.
This takes time and practice.
Remember to not press too hard, as we don’t want stroke lines or indents in the paper.

Credit: http://zidimperio.com
This is most important:
Know it is perfectly normal for artists to look at reference photos.
It is not cheating to look at pictures or objects in front of you.
It would be impossible for anyone to draw from memory and have your work look realistic at the same time.
Some of the details will have to be freehand because let’s be honest there aren’t letter shaped bubbles out there for you to reference, but at least you can get a better idea of where to place details like highlights and shadows.
When drawing the word, keep in mind the feel of the word.
For example, water and slime have a feel of flowing, which translates into around corners, as opposed to square or sharp edges.
I use a brush marker for the ribbon letters.
When, typically, using a brush marker, the upstrokes are thin and downstrokes are thick, but with ribbon letters, I keep the same thickness/pressure throughout the word because, ideally, a ribbon in real life will have the same width throughout the whole length of the ribbon.
Okay, let’s get to it!
The 5 hand lettering effects that anyone can do
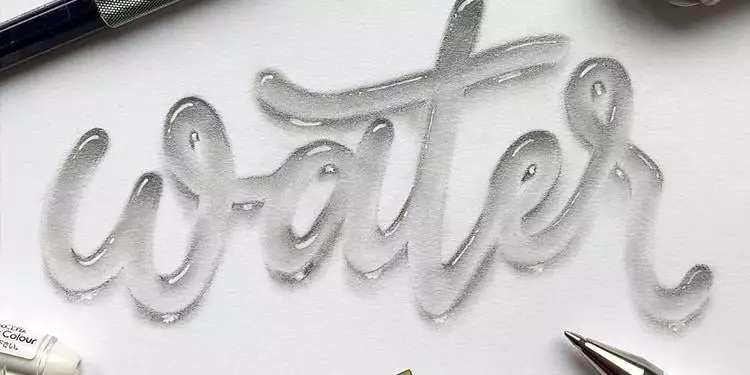
1. Water letters

You will need:
Step 1: Lightly draw the outline of the word in pencil.
Step 2: Pick where you want your imaginary light source to be.
But here’s the kicker:
With water, your highlights and shadows will be opposite than what you’re used to.
To mimic light traveling through water, the area closest to the light source will be darkest and the further away you go it lightens up.
I chose to have my light source directly above the letters.
Step 3: Shade the top half of the letters with your pencil.

Step 4: Using your Q-tip, smudge the pencil downwards, lightening the pencil shade as you go.

Step 5: Erase any smudge marks outside the outline of your letters, to clean it up a bit.
If you need to lighten up some areas you can use an eraser to take away some of the lead.

Step 6: Since my light source is above the letters, the cast shadow with be below the letters.
To add the cast shadow, shade with your pencil around the lightest areas and smudge slightly with your Q-tip.


Step 7: When light travels through water, there is a reflecting light that shines through onto the paper.
So, erase part of the cast shadow in the middle.

Step 8: Using white gel pen, add highlights where the light source would be reflecting off the water surface.

Check out this video for a better reference on the water letters effect.
2. Bubble letters

You will need:
- Black paper
- Pastels or colored pencils (white, black, and any number of colors you want to use)
- Q-tip or blending stub
- White gel pen
Here’s the deal:
There’s no right or wrong way to make these bubble letters.
You can pick as few or as many colors as you would like.
Depending on the look you want to achieve.
I will be using pastel pencils for this, but colored pencils can also be used for this technique.
Step 1: Lightly draw the outline of the word in white.

Step 2: Pick your colors and randomly color inside the letter along the outline.
It is okay if there are gaps because it does not have to be perfect.
Try to avoid coloring the center of the letter.
You can make the colors as vibrant or mute as you would like.
I am making mine more muted.

Step 3: Using a Q-tip, blend the colors together.
Again, this does not have to be perfect.
There can be areas where the colors are more concentrated than other areas.

Step 4: Take your black pencil and color in the center of the letter and random spots along the outline.

Step 5: Smudge and slightly blend the black with the colors.
Careful not to take away too much of the color.
The reason we did this is that bubbles are not colorful all the way around.
There are sections where the bubble is completely translucent and the black paper should show through.

Step 6: Repeat steps 2-5 until you are satisfied with the how vibrant the colors and dark the black center look.
Step 7: Take your white pencil and color in your “window reflections” like I did in the upper left and lower right of the bubble.
You can place these anywhere.
It’s okay if some of the colors blend with the white at the ends, but for the most part, these reflections should be pure white.
Place random highlights besides the outline, leaving a slight gap.
You can also place random dots to add more highlights.
I’ll add a white gel pen to my highlights to brighten them up and make them more opaque white

Step 8: I’ll take my black pencil again and color around the letters on the outside.
I’ll smudge the black and blend it into the paper.
This covers up any accidental smudges created buy loose powder that occurred while coloring in the bubbles.
Check the video for how to create the bubble letters effect.
3. Glitter letters

You will need:
- Mixed media paper
- 4 markers in the same color family (1 light, 2 medium, 1 dark)
- White gel pen or Dr. Ph Martin’s Bleedproof White with paintbrush
Warning! Stippling haters beware! Seriously though, it’s all stippling.
Step 1: Lightly draw the outline of the word in pencil.
Step 2: Decide where you want your imaginary light source to be.
I am placing mine on the top left corner of the paper.
We will be going from light to dark.
Start with the lightest color and start stippling on the side of the letter closest to the light source. As you approach the center, space out the dots more and more.

Step 3: Around the middle of the letter, start stippling with the lighter medium tone marker.
As you approach either side of the letter, spread out the dots more and more.
Slightly, overlapping yet preserving some of the lightest color.

Step 4: Take your darker medium tone marker and start stippling the rest of the letter that is furthest away from the light source.
Overlap and preserve the lighter medium tone color.
As you get closer to the center and other side of the letter space out the dots. Add a few dots in the lightest area.

Step 5: Continue to do steps 2-4 until you have a dense cluster of dots.
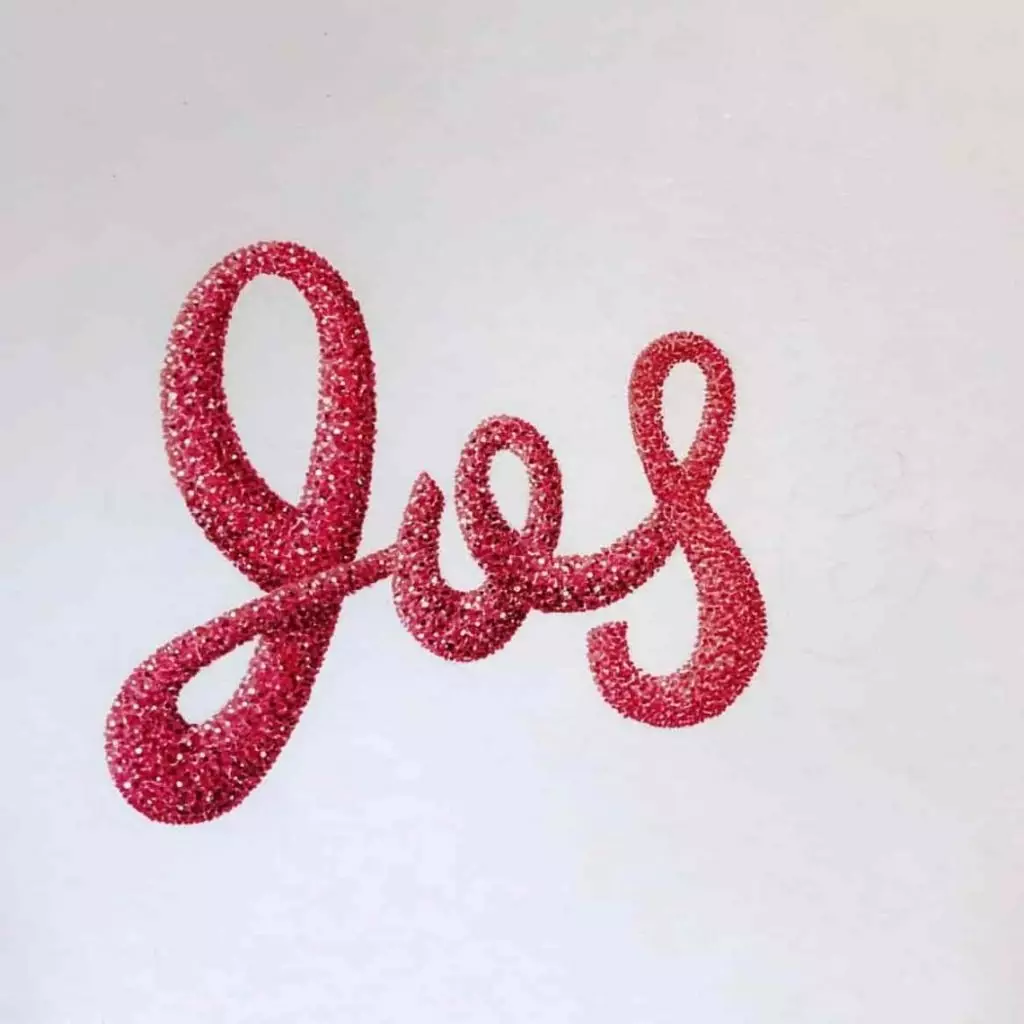
Step 6: Take the darkest color and stipple the area furthest away from your light source, where the shadow would be. I also add shadows where a letter meets another letter.

Step 7: Take your white gel pen or Dr. Ph Martin’s Bleedproof White with a paintbrush and stipple the lightest area, keeping the color.
As you more toward the middle and furthest end, spread out the dots.
Add a few dots in the darkest area, but not too many.

Check out the video on how to create the glitter letter effect.
4. Slime letters

You will need:
- Mixed media paper
- Pencil
- 1 marker
- Waterbrush
- Colored pencils (in the same color family as the marker, white, and black)
Step 1: Lightly draw the outline of the word in pencil.
Step 2: Color in your word with marker.
It doesn’t have to be perfect, but try to avoid putting too much color where your highlights will be.
You can concentrate the color where the shadows will be.

Step 3: Take a water brush and even out the midtones as best as you can.
Again, avoid putting too much color where the highlights will be.
It does not have to be perfect.

You might be wondering:
Why are we doing this?
We are adding color to the paper so that we do not have to color as much with the pencils in order to cover up the white of the paper.
Let the paper completely dry before starting the next step.
Step 4: Pick which direction you want your light source to come from.
I am placing mine to the left of the word.
Starting with your white colored pencil, add your highlighted areas.
Again, we will be transitioning from light to dark as we move further away from the light source.
Step 5: Shade the area furthest from the light source with your darkest color.

Step 6: Blend a midtone color with the dark color.
Then, take a light tone color and blend that with the midtone color and the white highlight.


Step 7: You can darken the shadows and areas around the drips by adding a little black.

Check the video tutorial for a better reference on how to create the slime lettering effect.
5. Ribbon letters with a drop shadow

You will need:
- Marker paper
- 1 black brush marker
- 2 brush markers in the same color family (1 light, 1 dark)
- Blender marker
- Pencil
- Q-tip or blending stub
- Eraser
Step 1: Write your word in black marker on any paper.
It doesn’t have to be marker paper, specifically.

Step 2: Place that paper under a sheet of marker paper and trace the word in the lighter of the 2 color markers.

Now:
When doing ribbon letters, where one letter connects with another, close to the bottom of the letter, and if there is a crossover section, I will add shadows to these areas.
Step 3: With the darker of the 2 color markers, add your shadows.
Think of how a ribbon twists and folds and how it will go from the front to the back side of the ribbon.

Step 4: Blend the shadowed areas with the base color using a blender marker.

Step 5: To do the drop shadow, take that first paper where you wrote the word in black and place that anywhere (literally anywhere, you can’t mess this part up) underneath the marker paper with your ribbon word on it.
Take your pencil and lightly trace and shade in the area where the black is showing underneath.
If the ribbon is covering the black marker underneath, don’t worry about shading that area with your pencil.


Step 6: Take a Q-tip and smudge the pencil so it is an even shade throughout.

Check out the video tutorial on how to create the ribbon lettering effect.
Now that I’ve shown you these 5 awesome lettering effects, it is your turn to try them out!
Look at reference photos, when needed, for additional inspiration.
You will do great as long as you remember the basics like where to place highlights and shadows, blending, and shading.
Practice, practice, practice! And remember to have fun!
Until the next one,
Stay AWESOME!

Stay updated with my tutorials and get instant access to the Lettering Crate –
A growing library of free lettering & calligraphy resources that includes –
Pin me!

About the author
I am a hospital pharmacist and lettering artist living in Cleveland, Ohio. About a year ago, I started hand lettering as a way to relax at the end of the day. I never thought it would have such a big impact on my life, but I’m glad it did.

Awesome ! Thank you sm these are su cool and def will he trying them as part of my new meditation practice
This was incredibly helpful. I did the bubble letters on white paper and with $2 colour pencils. Glad to know that it still works out. It was very fun to draw it.
Awesome! So glad to hear that 🙂 Would love to see the final result.
I would love to share it with you but I can’t see the sharing option
There is no option unfortunately. Feel free to shoot me an email at [email protected] 🙂
Thank you for your eye catching tutorial. Unique lettering subject…water. Well done.
Glad you like it! 🙂
I didn’t see active links to any videos in the post. Were they taken down at some point?
Hey Carmen, Sorry for that. I would suggest that you turn of your ad blocker for this website. This is at least what I’ve been told from the technical support team. Let me know if it works! 🙂
This is amazing, thanks teacher
You are welcome Samuel! 🙂
Wow. Specially water effect is so beautiful. Thanks fr teaching all types of lettering. Loved them all. Will surely try them.
Found this post through Pinterest and loved it! Thank you for sharing some very advanced looking effects for beginners!
Thank you Tracy! Happy to hear that 🙂
These tips where amazing! I’m personally a huge fan of glitter letters 🙂 Thanks for writing this very thorough guide!
SOY UNA MUJER MUY MAYOR , QUE SE LA PASA ESCRIBIENDO O HACIENDO MONITOS, POR AHI DESCUBRI EL LETTERING, Y ME HA RESULTADO ADICTIVO , GRACIAS POR ENSEÑARME,