
Drawing letters in perspective may seem as a daunting thing to create, and without knowing the theory behind it, it can turn out to be quite a hustle.
Here at Lettering Daily we are all about learning new things and pushing our boundaries, stepping out of your comfort zone and expanding your creativity. We are so happy to share with all of you this AMAZING step-by-step tutorial written by Selina from @letteredinlovecreations
Here are some of the things you will be learning in this article –
- Difference between 1 point and 2 point perspective
- Needed tools
- How to draw a proper grid system
- Adding depth
- The basics of shadowing
Without further ado, we are shifting the spotlight to Selina. Enjoy the tutorial!
Hello everyone! I’m so excited to have the opportunity to share a tutorial with you today! I have a love affair with lettering and it’s always a pleasure to teach anyone who might love it as much as I do.
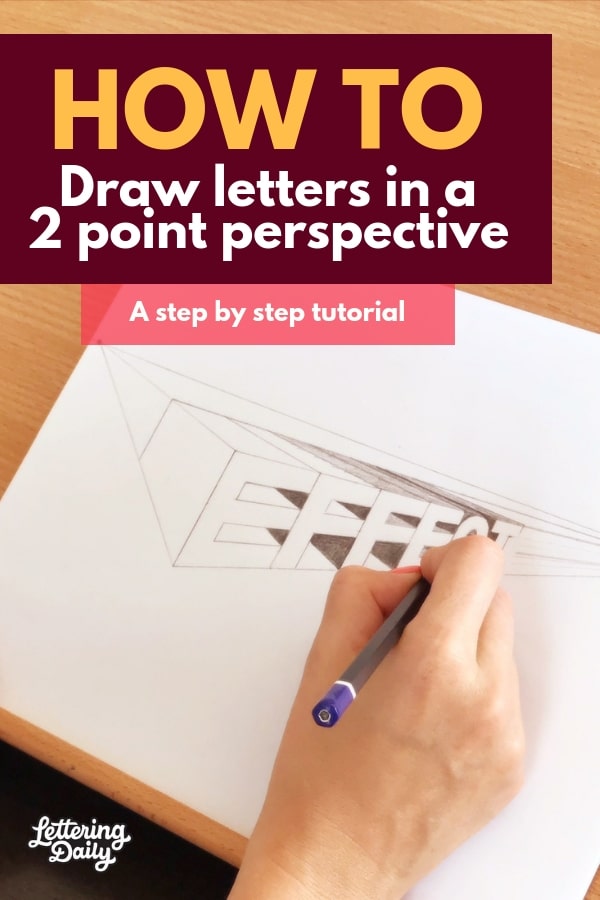
Today we’ll be learning the basic fundamentals of two-point perspective lettering.
For those of you unfamiliar with the term perspective lettering, it is simply the way to add depth and dimension to your letters so that they appear to have 3D characteristics.
For example, as you stand on a street and see the houses or buildings recede into the distance, you are looking at a them through the perspective lens.
Learning the laws of perspective can help you to create more interesting lettering pieces as you branch out into the world of angles and shadows.
Practicing these basic principles until they make sense to you can help you create more complicated perspective pieces in the future, and take your lettering to a whole new level!

A one-point perspective piece has only one vanishing point, like the example below. All of the letters appear to recede into the distance towards that one point.

But for our lesson, we’ll be tackling a basic two-point perspective piece with a single word in block letters.
This means that our letters will be angled towards one of two vanishing points, while the vertical lines remain perpendicular to the bottom of our page.
Don’t worry if it doesn’t make sense to you yet…once you begin it will become easier to understand.
I promise that no mathematics will be required!
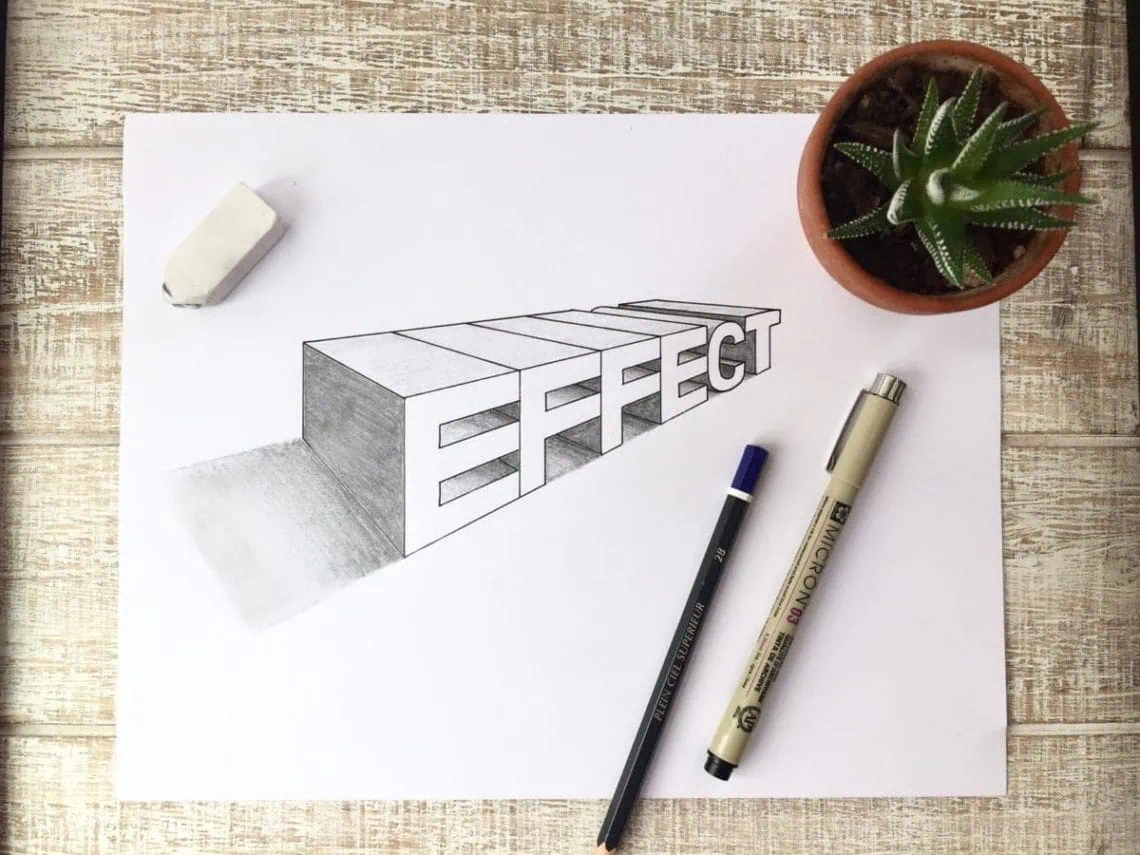
I’ve chosen the word “EFFECT” for this tutorial, since it only has one letter with any curves. Letters with curves like “S”, “B”, “R” etc. can be more of a challenge for perspective lettering, so we’re starting with a simple word to keep it achievable for any beginners out there.
So let’s get started!
Tools you’ll need:
- Paper
- Pencil (I like to use a basic 2B pencil since it’s softer for shading)
- Eraser
- Ruler (I love transparent grid rulers, but any one will suffice)
- Black Ink Pen (I use mostly Sakura Pigma Micron pens)

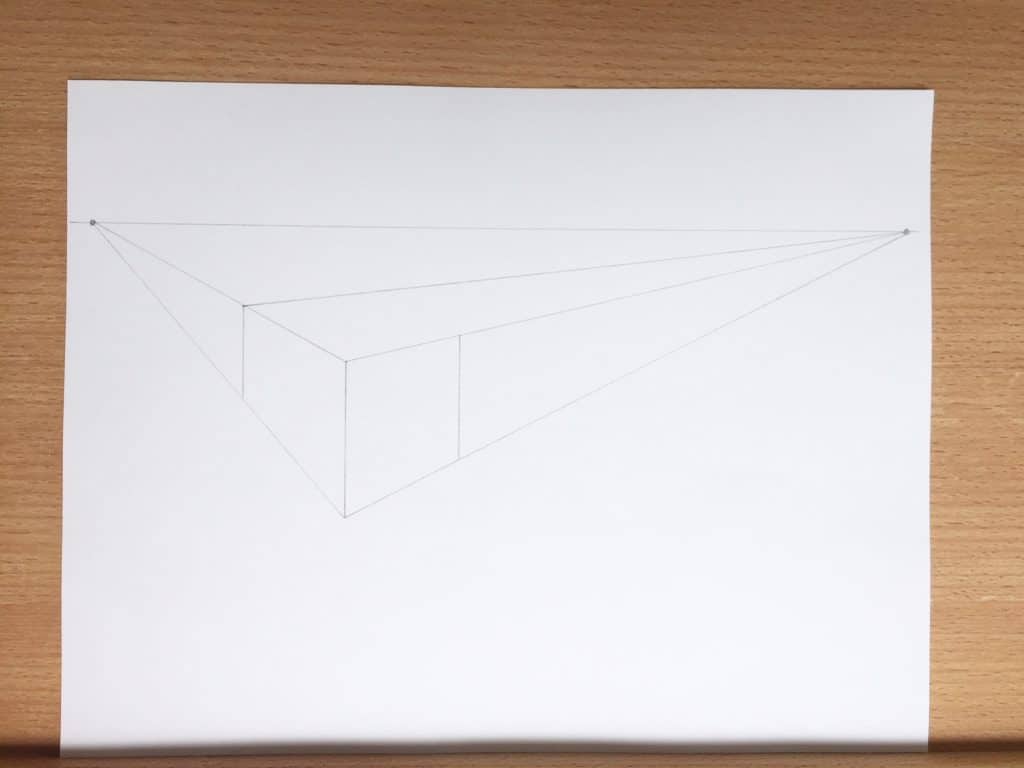
Step 1: Create a Horizon Line and Vanishing Points
Draw your horizon line about a quarter of the way down from the top of the page.
Keep in mind that we will be erasing a majority of our pencil lines later, so keep these guides light enough to erase easily.
Place dots on both ends of this line, near the edges of the page.
These dots will be your vanishing points.
These are very important, because all of your lines that aren’t vertical will be angled towards one of these points.

Step 2: Create Some Guidelines
Now draw a 2-inch vertical line about halfway down from the top of the page, and about a third of the way from the left side.
This will be the first corner of the closest letter to us.
This will be your point of sight, meaning that if you were standing inside your page, you would be looking at the word from this point.
It’s important that all of your vertical lines are at a 90 degree angle (or perpendicular) to the bottom of your page, or your angles will not look quite right.
This is where a transparent ruler can come in handy to square up your ruler, or you could even use a T-Square ruler if you have one.
If you don’t have either of those, just try to line up the short side edge of your ruler with the bottom of your page to keep it as close to vertical as possible.

Now connect both the top and the bottom of this line to both vanishing points.
You can see the guideline take shape, and the angle at which your word will appear get farther away from you.

Next, determine the width of your nearest, biggest letter.
I’ve made mine around an inch and a half wide on both visible sides.
Draw two vertical lines between your guidelines on either side of your point of sight line.

For our piece, our letters are going to be facing out to the right, and the nearest letter will be the “E” at the beginning of the word.
The depth (or back) of the letter will be angled away towards the left vanish point.
To create the depth of the entire word, connect the top of your farthest left vertical line to your right vanish point.
Step 3. Determine the Width of Your Letters
Now it gets a little tricky but not to worry, the fun part is coming so stay with me!
We’re going to determine the width of the remaining letters.
The width of our letters cannot all be equal if we want it to be a realistic perspective piece, because as they recede into the distance, they should appear to get smaller.
So in order to achieve this, we will use a simple trick with our ruler.
Find the middle of your point of sight line and draw a line from that middle point towards your right vanish point.
This should create a mid-line between your top and bottom guidelines.
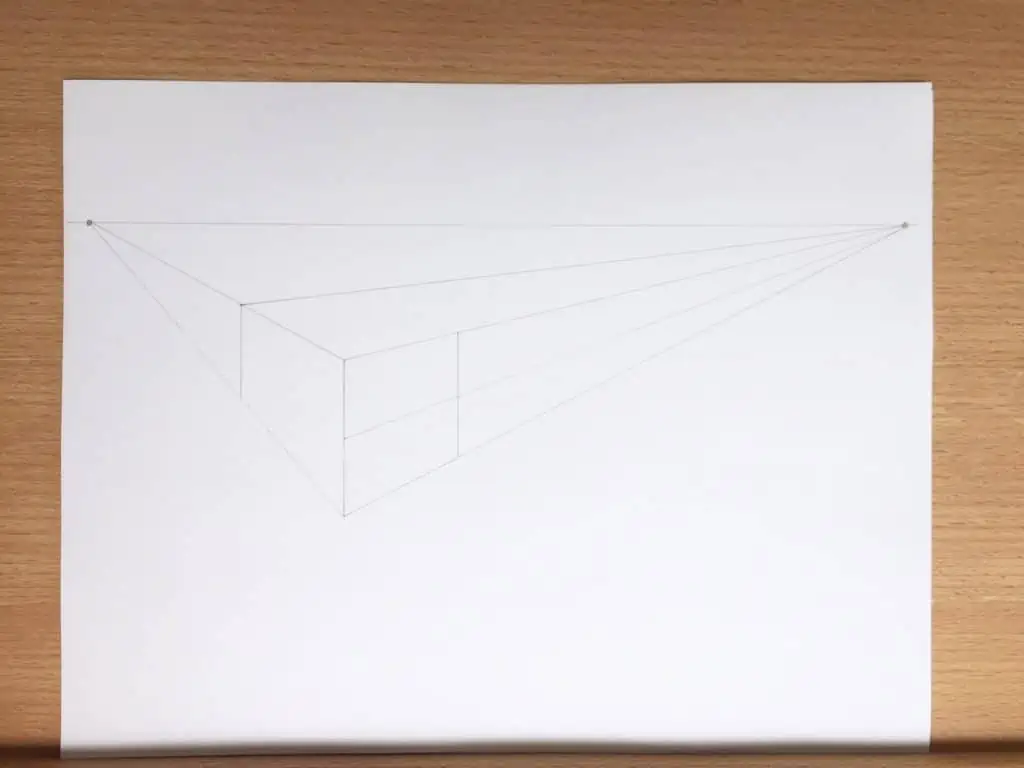
Now angle your ruler from the very bottom of your point of sight line, through the point where that middle guideline intersects with your farthest right vertical line, and to the top of your word guideline.
You should have a diagonal line going towards the top right corner of your page.


This point at the top of your guideline where the diagonal line intersected with your guideline will be the width of your next letter, so draw a vertical line down from that point. Remember to keep it 90 degrees from the bottom of your page.
Are you still with me?
Now, repeat this step using the next line over, and then the next line over from there, etc. until you’ve created six “boxes” into which we can form our letters.

Step 4: Form Your Letters
Phew! Do you feel like you’re in a geometry class yet?
I told you that was tricky, but as promised, the fun part starts now.
Form some block letters inside each of your boxes.
You may find it useful to draw a few guidelines towards your right vanishing point so that it’s easier to get your angles consistent.
Use your ruler to keep your lines straight.
Keep in mind that the weight of your letters (or thickness) should get narrower as they get further away, and that any “horizontal” line should be angled toward your right vanish point.


Step 5: Add Depth
Now that we have our letters formed, we’re going to add depth to them by using our left vanish point.
Using your ruler, connect all exposed edges and corners of each letter to your left vanish point.
You don’t need to draw your lines all the way to the vanish point, but only to the guideline we drew earlier that determined our depth of our letters.
Try to keep the back of the “C” curved to match the front of the letter.
We’ll zoom in a bit on our drawing to get a better look at the details.
I’ve gone ahead and carefully erased any guidelines I had in order to better see my letters.

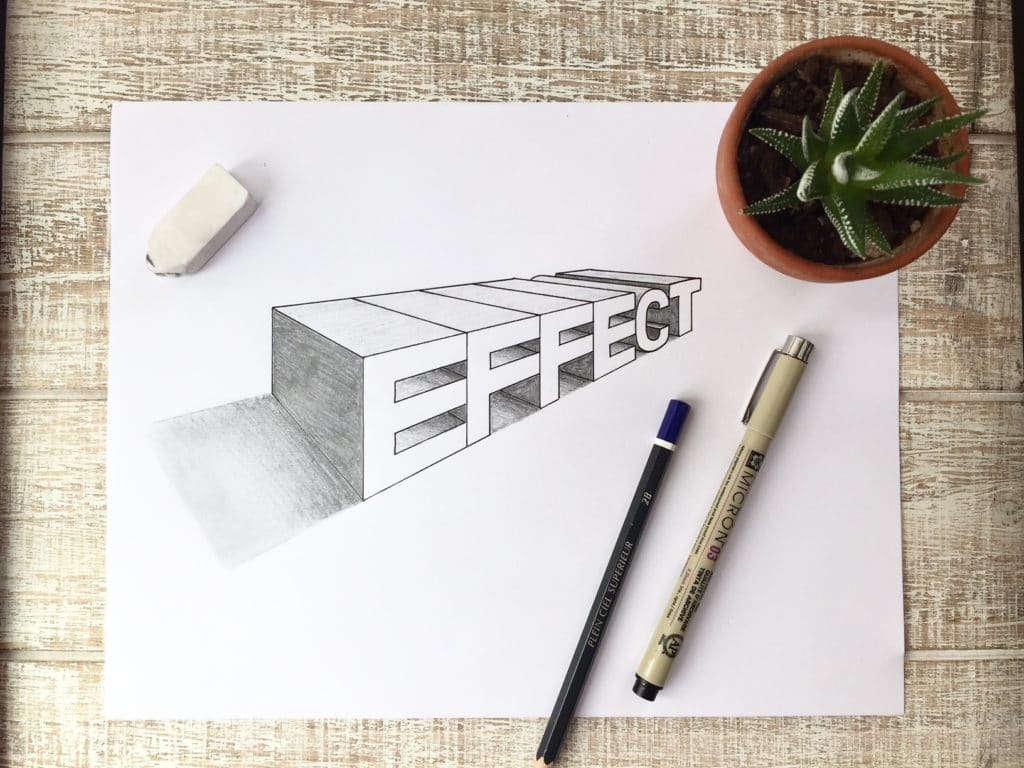
Step 6: Ink Your Word
At this point you should give yourself a huge pat on the back, because your word already looks amazing!
To take it to the next level, we’re going to add some ink and then some shading.
Trace your pencil lines that form your letters with your black ink pen, using your ruler when needed, and carefully erase any remaining pencil marks.
(Leave your right vanish point there for now, we’ll use it again later).
Be sure to let your ink dry before you erase, though, otherwise you might smudge your beautiful work!

Step 7: Add Shadows
Ok, I know realistic shadows can be difficult to master, but we’re going to keep ours pretty basic today and break it down into three steps: light, dark and gradient.
For this piece we will place our light source at the right vanishing point.
I like to use a soft pencil like 2B for shading, because it’s easier to blend and doesn’t leave obvious pencil lines.
Sometimes it’s helpful if your pencil isn’t too sharpened to create a softer look.
Let’s start with our lightest shade.
These will be any areas along the top of any horizontal surface.
In other words, the tops of each letter block, the top of each “E” leg, etc.

Next, we’ll add our darkest shadows.
These will be any vertical surface facing towards the left (or away from our light source).
Don’t forget that small area at the left side of the top of the “T”.

Now we’re going to add some gradient shading to our light shades in the middle of the letters.
Starting at the areas where the light meets the dark, darken your shade, gradually lightening the pressure as you get further away from the starting point.
Keep your shadow gradients parallel to your angles.
I like to use a combination of lines and tiny circles to create a blended look.
You can use the tip of your finger, cotton swab, or piece of cloth to smudge your pencil a little bit and create a smooth gradient.

Finally, let’s create some additional gradient shading on the surface that would be considered the ground or base of our word.
It’s helpful for the area coming off of the closet “E” if we have some guidelines using our right vanish point, so that we know where to keep the shading.

Using the same technique you used above, begin at the darkest point and gradually lighten your shadow until it fades into the lightest shade you wish to create.
Don’t forget to use your finger or cotton swab to blend your shading so that your pencil marks are minimal.

When you’re happy with it, erase the remaining guidelines and sharpen up the shadow cast from the “E” by erasing the smudges from the sides of the shadow along your guidelines.

Congratulations!
You’ve successfully created a two-point perspective piece that you should be proud of!
Now think about trying this method out with your name, or another word that’s meaningful to you.
Try a longer word, or try doing it from the opposite angle.
The more you practice, the more you’ll understand the concepts of perspective lettering, and be able to create even more impressive pieces!
Thank you for following along and trying something new today!
Until the next one,
Stay AWESOME!

Stay updated with my tutorials and get instant access to the Lettering Crate –
A growing library of free lettering & calligraphy resources that includes –
Pin me!
About the author

Selina Painter is a part-time lettering artist from Washington State. What started out as a hobby for her has quickly turned into a lifestyle she loves. After selling some hand painted signs to friends for some extra money, she started being approached for custom jobs, murals for businesses, and wedding signage. After expanding her horizons with so many custom requests, she is now aiming to start her own business and pursue lettering full-time

Thank you Selina for the exceptional lesson! I almost threw in the towel, but hung in there and glad I did. This is the best looking page in my sketchbook! And, I use the Pigma Micron 05 pen. I can’t imagine trying this with anything else. I’m planning to browse your site for more tips.
Thank you, Wayne! Happy to hear that the tutorial was helpful for you 🙂
Thank you so much! This was a really good step by step. Question: If you are using stacked words, say for a poster, would you use the same vanishing points for all of the levels? For example for a poster that says You are awesome! with the three words stacked on top of each other, would the you, the are, and the awesome all use the same vanishing points, or would each word have its own? Thanks again for the awesome tutorial!
You could do that but I would rather create separate vanishing points for each row. Just try to keep them at the same height for each row. If you just have one line as a vanishing point the effect can get too distorted. Hope this helps! If you need more help, feel free to reach out via email 🙂
Excellent explanation – I use your page for my Graphic Design students! Thank you!
Hey Dave! Thank you so much for the kind comment 🙂 I feel honored that my website is being used in that way. Cheers to you and your class! 🙂
Thank you so much Lettering Daily. I’m completely new to the world of Lettering.. I was wanting to learn perspective lettering and your post was exactly what I was looking for. Easy to follow steps and so well explained.
Thank you so much for the kind comment 🙂
Super happy to hear that you liked it!
This was one of the best tutorials I’ve seen and exactly what I’ve been looking for! I’ve never formally been trained in creating perspective and this helped me understand the steps beautifully! Thank you so much!
Thank you, Amy! I am so happy when I read comments like yours 🙂
Wow… This was complete fun packed tutorial. I have been doing 3D lettering from some time but never went into it’s basics. This 3D perspective tutorial was very helpful. Thanks a lot Selina and Lettering Daily.
You are very welcome! We are super happy to hear that you enjoyed the tutorial 🙂