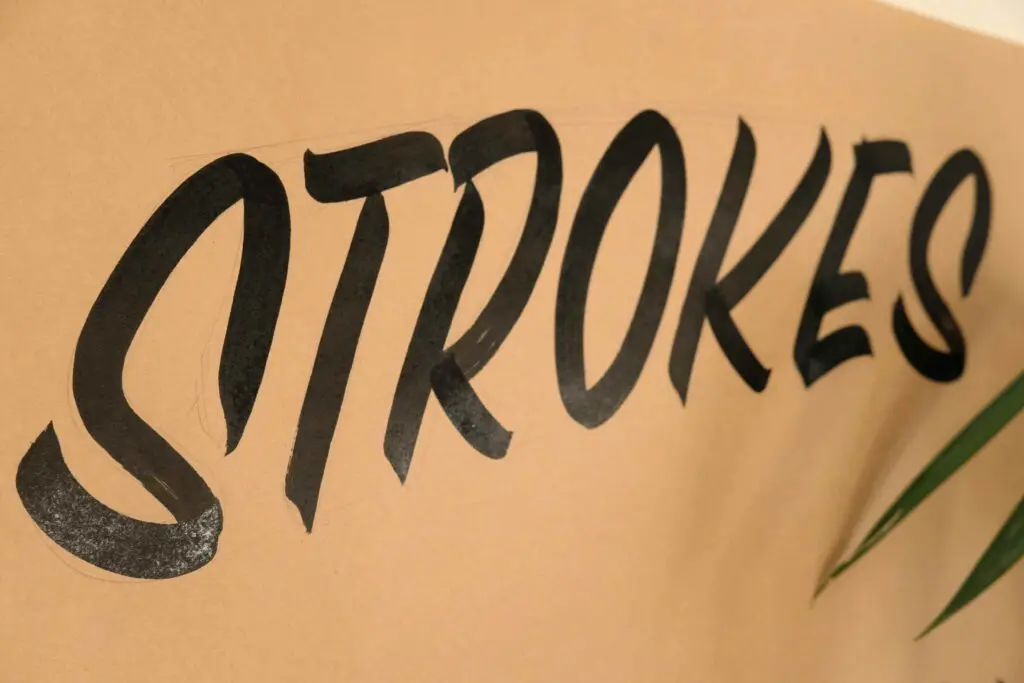
Sign painting is a very intriguing craft with a long and rich history behind it.
As any other skill, we believe that with a great teacher and a lot of practice you will always be able to move forward.
I am so excited and grateful for the huge effort my friend Gaston the Painter invested in order to teach all of YOU the fundamentals of sign painting.
Gaston is a self-taught sign painter and lettering artist based in Melbourne, Australia, who managed to turn his passion into a career throughout hard work and dedication.
We would also like to thank Jeremi Laverdiere Blouin for the awesome photos he took for this article!

What will you learn in this tutorial?
Some of the things Gaston will teach you are:
- The required tools and materials
- Explaining the similarities between lettering and sign painting, and how to use them to your advantage
- The basics of a sign painting brush
- The entire process of creating your own sign painted piece
- Practice sheets for your future practice
- Maintenance of your sign painting tools
Hey everyone!
Thanks for joining me on this tutorial.
Sign painting is such a fantastic discipline!
I think we can all agree on how beneficial it is to learn this craft as a lettering artist –
It’s characteristic shapes and letter styles are timeless, hand-painted signs are back in fashion and in high demand,
and not only that,
they will also provide you with a sound understanding of letter forms and how they are constructed, upgrading your letter skill set!
As if that wasn’t enough,
it is a great skill to acquire and can be used for jobs or artwork anywhere you go.

What is this tutorial all about?
In this article, I’ll be sharing what I have found to be the best tips and tricks in regards to beginning sign painting,
as well as going over the similarities between lettering and Sign painting and how to use those to your advantage.
I will also hook you up with some practice sheets to keep playing around with and improve your technique!
By the end of this tutorial, you will know everything you need to know to get started, and will be well on your way to painting your own lettering designs!

So, what do you need to get started?
1. Work Space
When working with oil paints and their thinners, it is not ideal to be exposed to its toxic fumes.
It is important to be mindful of materials work in a well-ventilated space, take breaks often, and do not eat or drink whilst painting.

2. Paint
Whilst different paints can be used for different jobs or practice,
most sign painting jobs are undertaken with the most durable and efficient paint available, usually synthetic enamels.
The most popular brand among sign painters is called – 1 Shot Lettering Enamel
Being Oil Based, we use mineral spirits to clean brushes and thin out the paint.
It is important to be very careful as it is poisonous!

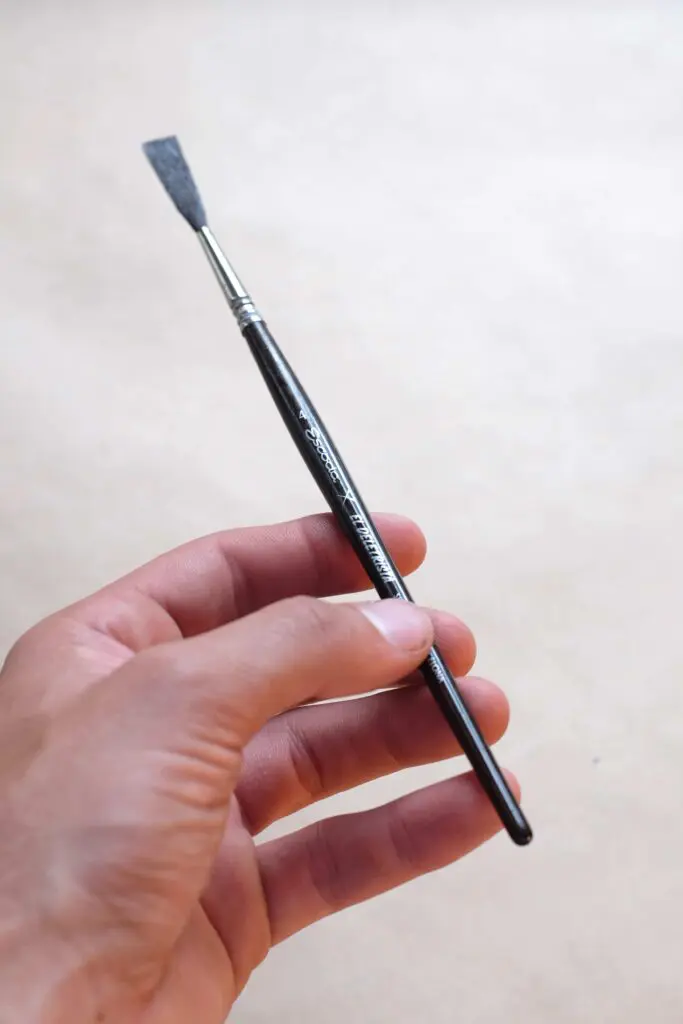
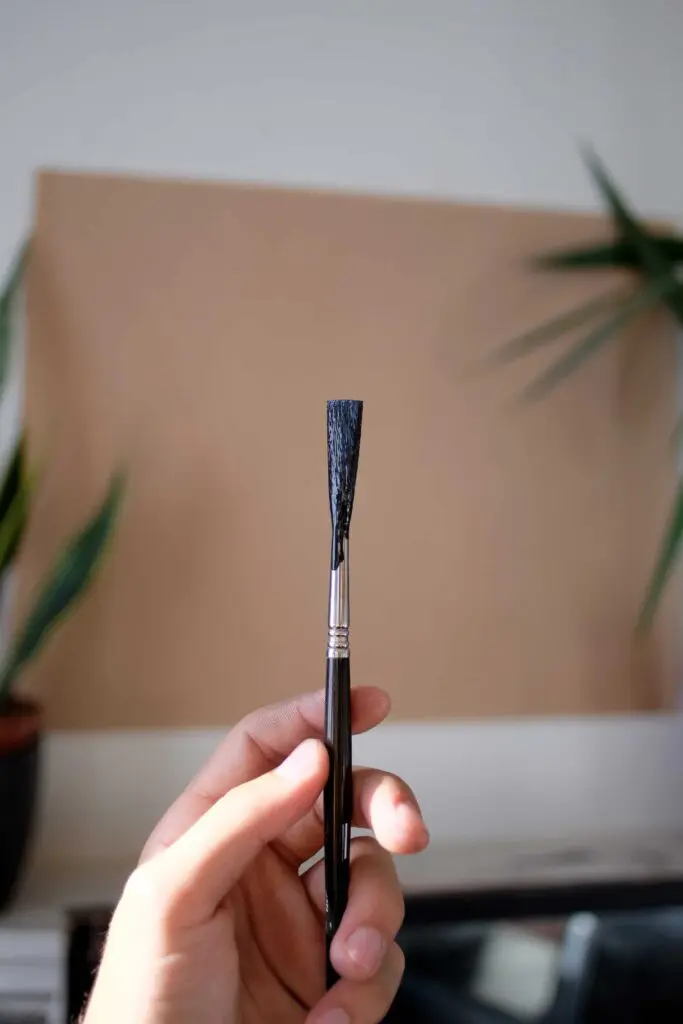
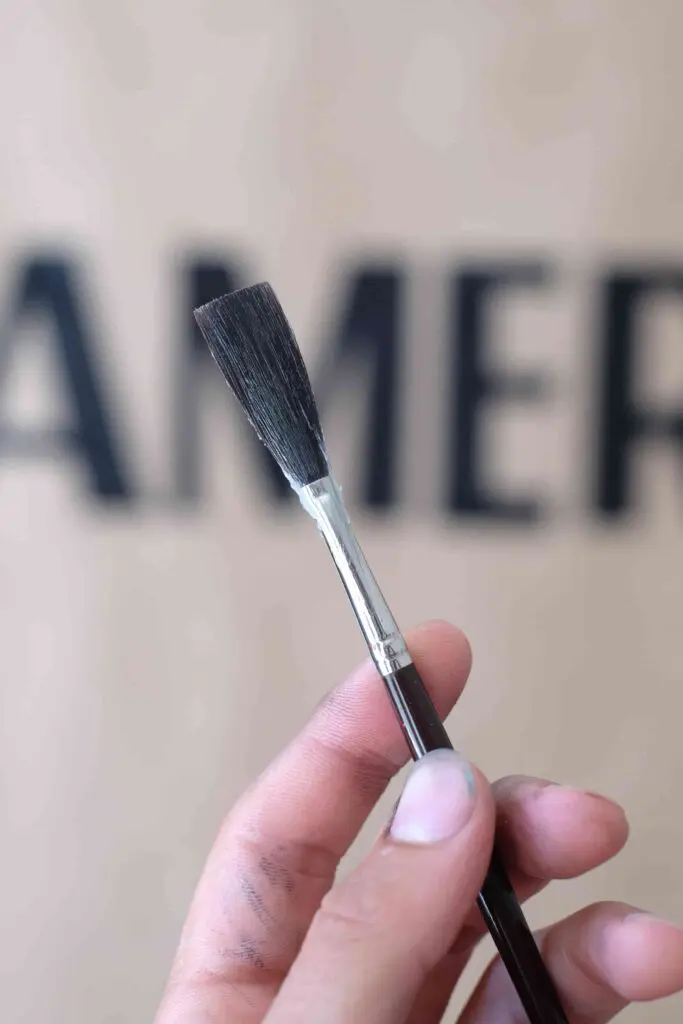
3. Sign painter Brushes
Sign painter Brushes are the single most important item on this list and will be the focus of the tutorial.
It is an amazing tool to use once you master it, but can be quite difficult to figure out.
Fear not!
As this comprehensive guide will aid you through its nuances and movements.

Whilst Chisel-Tip Brushes are a dime a dozen, it is wise to invest in a true sign painter brush as they have the hair length, quality, tip shape, and construction to ensure a responsive and trustworthy tool.
I recommend Escoda’s line of sign painting brushes, however, if you are unable to get the Escoda’s brushes, you can also get the Mack brushes.
If taken proper care for, a good sign painter brush will last you years.
4. Paper
You will want to be working on a comfortable scale, so as to use the full range of motion of your arm – not just your wrist.
I use this craft paper roll which is huge!

It’s also convenient to have quite an amount of paper, allowing yourself to make mistakes, scrap the paper and prepare another fresh sheet.
Also, the paper is easier to simply tack onto the wall, lay flat on a table, or even on a sloped angle.
Being able to have a comfortable posture is really important to allow flowing movements.
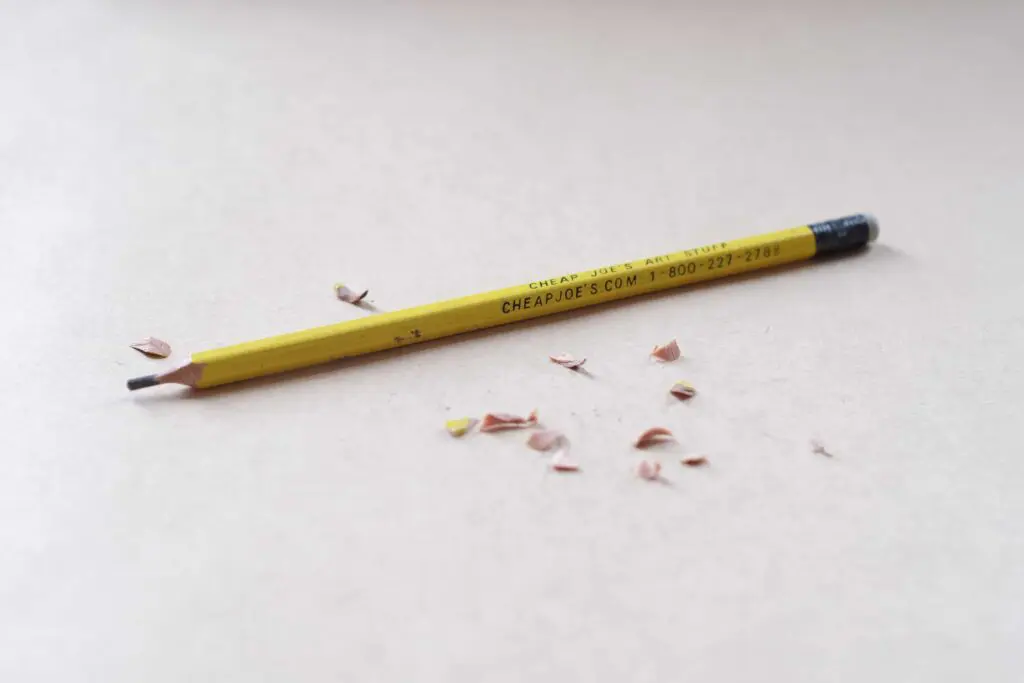
5. Pencil
I always use 2B Pencils – they are a little bit softer, allowing for faster strokes, and also both a lighter and heavier stroke.
This lets you softly pencil out your design first and then refine it with a heavier hand after.
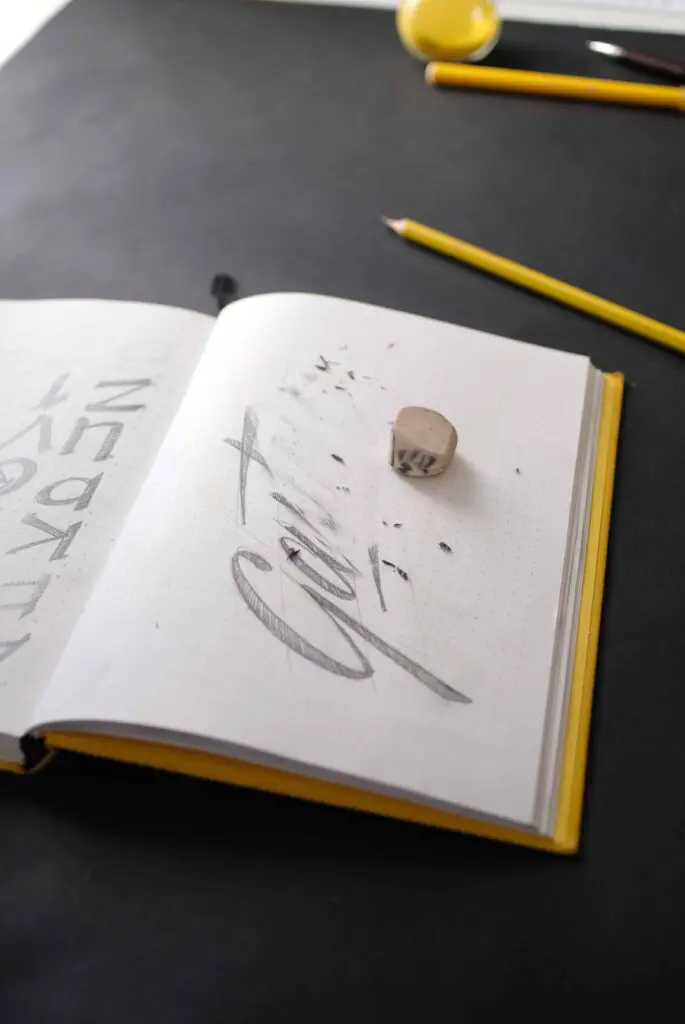
6. Eraser
Self-explanatory. Come on, we all make mistakes!
7. Thinners
Ah, Thinners! An absolute necessity.
Thinner will clean your brushes, keeping them whippy and flowing and will dilute your paint into the perfect flowing and covering consistency.
If you’re not working on paper, this will also serve as your ever so useful Ctrl + Z button!
If you make a mistake whilst sign painting, you can easily wipe it away with a wet rag dipped in thinner.
Always wash your brushes thoroughly – Before, during, and afterward every painting session, to keep your brush’s bristles sediment and paint-free

If paint happens to dry up in your bristles or ferrule (The metal piece holding the bristles in your brush),
I hate to say it, but it’s the beginning of the end for that brush.
It will end up unable to keep its shape, will carry less paint, and will begin to lose its hairs.
8. Brush Pens
As mentioned above, in this tutorial we will be using our lettering skills to our advantage,
by playing on the similarities between the sign painters brush and the brush pen marker.
Brush pens are also a dime a dozen, with plenty of options available – just use what is comfortable for you.
We will imitate these strokes later with our sign painting brush.
I recommend Tombow Dual Brush Markers orFaber-Castell Calligraphy Brush Pens.
If you want to explore your choices further, be sure to check out this TOP 5 brush pens review

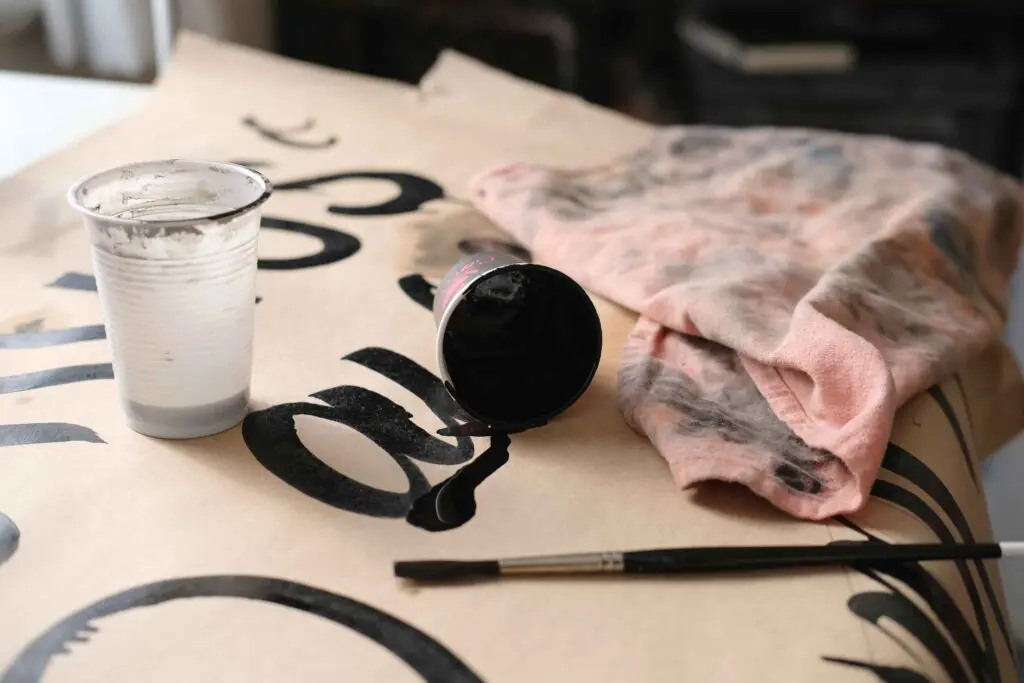
9. Cups and Rags
Things can get messy quick (And probably will).
Always keep a rag handy to wipe off excess paint, dry your brushes… or clean your mess. Got everything ready?
Let’s get started.
Once you are confident with you lettering skills it becomes easier to use it in your design projects such as Logo Designs, Monograms, Wordmarks, Packaging, Badges, Pins, Album covers, Murals, Brochure covers, Magazine covers and Editorial design etc.
Many professional lettering artists have also ventured into designing typefaces.
Advertising and digital campaigns use lettering as an effective way to communicate ideas.
Brands like Jack Daniels, McDonalds, H&M, Levi’s Jeans and many others have used hand lettering very effectively in their ad campaigns.
Bridging the Gap between Lettering & Sign painting
As said earlier,
applying your Lettering skills is a massive head start into Sign painting!
Sign painting is difficult, but soon you will be painting letters as beautiful as the ones you achieve with your brush pen.
As with most forms of Lettering, understanding what the tool is capable of and how it works is half the battle.
The sign painting brush creates strokes that are similar to those found in Brush Pen Lettering, however they work in a different way.
You’ll notice you will have to make different movements to achieve the same strokes with a brush instead of a pen.
Once you understand the movements of the brush and the strokes it produces, you are well on your way to painting letters!
It is tricky!
But I’m here to help you.

Sign painting Brushes
So, how do Sign Brushes work?
Ah, those pesky brushes, with floppy hairs at the top.
So unpredictable and hard to control, unlike the malleable and responsive Brush pens.
ive it a try, you’ll notice that if you pick up a brush and try to use it as you would your brush pen, you’ll run into problems.
In sign painting, there will be a lot less whipping about and pushing strokes, and a lot more pulling and dragging strokes.
Many of your gestural, fast swings will now have to be calculated and careful movements (At least until you’re a Pro. Soon, trust me.)
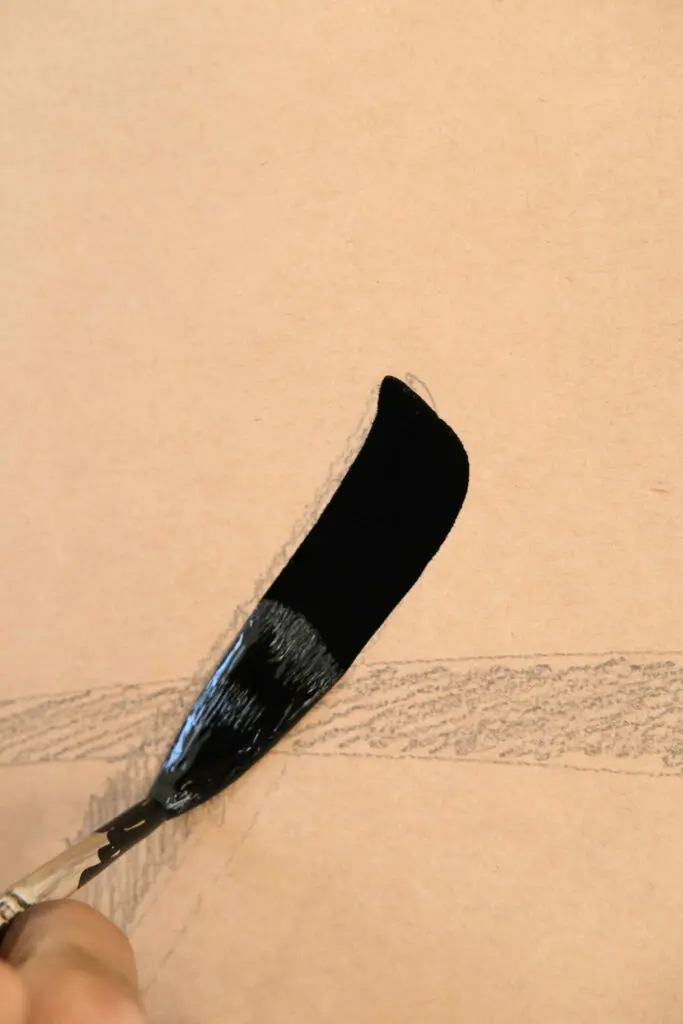
Because of the brush’s hair shape, if we simply lay it on the surface and begin to pull our stroke, the edges will look blobby and messy.
This is because you need to allow your brush to adapt into shape before you begin pulling on the stroke. We lay the brush down gently, on an angle, onto its chiseled tip.
You then gradually begin pressing down, expanding the brush’s hairs resulting in a wider shape that is easier to maintain.
Then we immediately begin to pull the brush, and you’ll notice that the stroke is nice and even, as the tip has kept its shape.
Already seem pretty tough?
Don’t worry.
With a couple more tips and tricks, you’ll have it all sorted out.
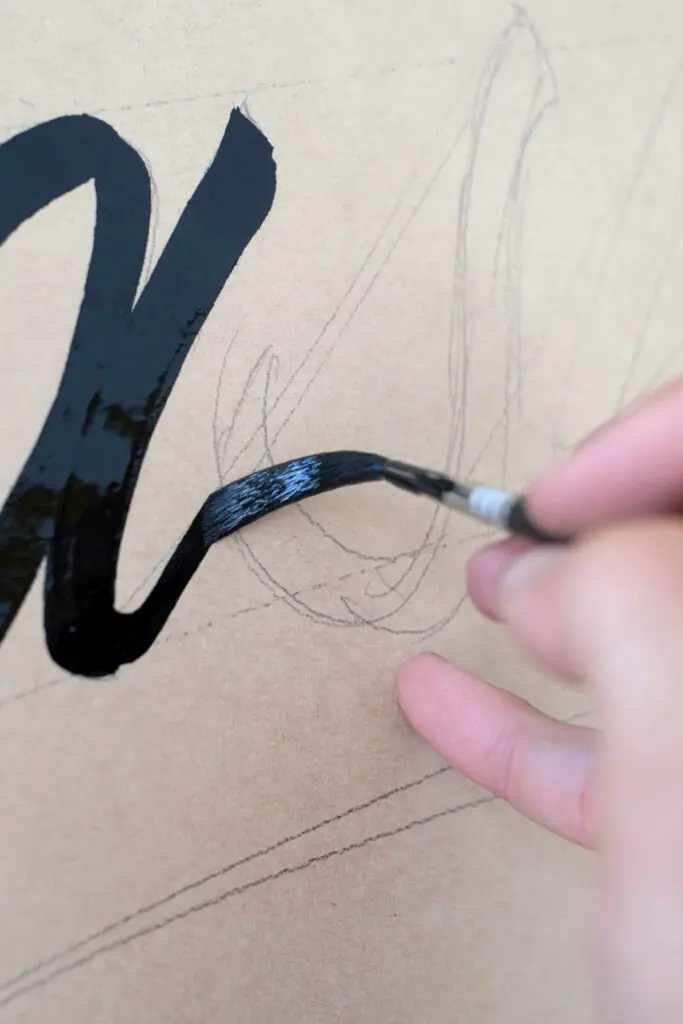
Shaping the Brush for your Strokes
This is why it is so important to Palette and shape the brush before commencing a stroke.
After loading your brush with paint, slide the excess off by sliding both flat sides of your brush on the edge of your paint cup.
You want to get a sharp and flat chisel shape, giving you a responsive and whippy tip, whilst still carrying enough paint to complete a stroke.

A big part of getting the right brush shape is using the adequate paint consistency.
Paint consistency will affect your stroke’s flow and coverage.
You will quickly develop a feeling for the right consistency intuitively, as you can easily tell whether your paint is too thin or too thick.

Too thin:
Paint runs too quickly, Difficulty maintaining stroke shape, drips, and runs, less coverage.

Too thick:
Slower strokes, feels stiff, ‘gluey’ consistency, streaks will appear in stroke, paint doesn’t apply flat.

Perfect
Got that down? You’re ready to move onto your strokes.

Sign painting Strokes
Similarly to Lettering, we don’t really just go ahead and paint a letter all at once.
We use individual, careful strokes to piece them together.
This is why we learn the strokes first, and how to build our letters afterward.
Now, how you ever heard the phrase
“Up Thin, Down Thick”
to describe how brush script Lettering is achieved?
This is true because of the brush’s properties as a tool.
When you’re painting a downward stroke, this exerts pressure on the tip – Resulting in a thicker
stroke as it’s hairs widen on its way down.

Upstrokes, however, are a little bit trickier.
When the brush is pulled up, the stroke thins as it’s hairs pull away from the surface.
When sign painting, you can do upstrokes by pulling upwards on the side angle of the brush, or you can (sort of) cheat by shaping your brush a little differently, paletting on its side, and downstroke applying a little less pressure than usual.
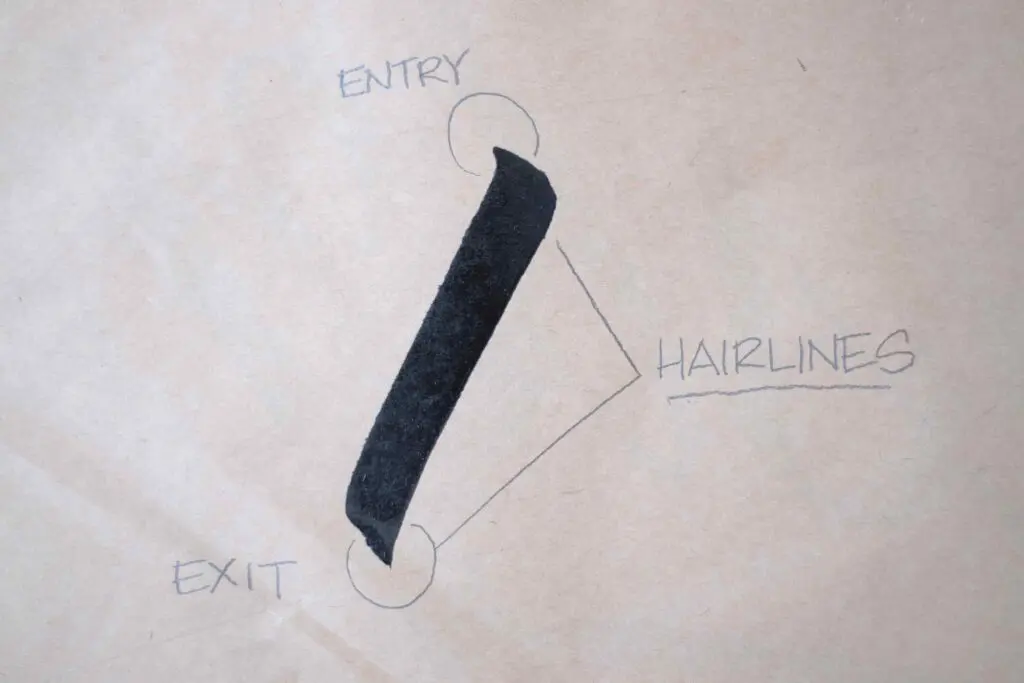
To keep our strokes starting and ending neatly, we enter strokes at an angle, pressing to form a flat shaped tip, and then pull the stroke.
To exit a stroke, we pull out to a side of the stroke, just as we are lifting the brush and peeling it away from the surface.
This will result in hairline ‘kicks’ or ‘tails’ at the start and end of strokes and are a byproduct of the way we enter and exit these strokes and how we twirl the brush.
Lovely ‘snaps’ or ‘kicks’ on strokes are telling of a talented or experienced sign painter!
Try it out!
Try practicing your straight and curved strokes first, and your upstrokes after that.
You can see how Gaston produces upstroke, curve, and downstroke in this video of him sign painting
Here are the basic sign painter strokes for you to practice with.


Fantastic.
Now that you’ve got those strokes down, you’ve got the harder bits of sign painting out of the way!
Now let’s cut the chase and give it a go.
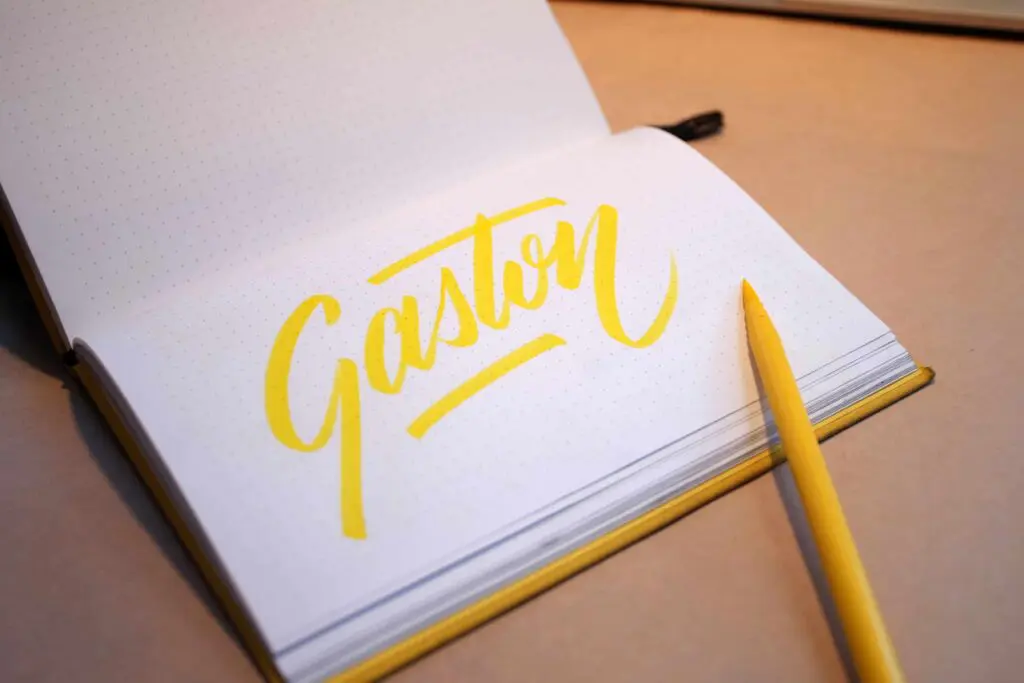
Design your Lettering!
First, write the word of your choice with your brush pen.
Anything will do!
Feel confident. Use your regular style and the shapes you are comfortable with.
It doesn’t need to be a refined design, as you will later let the brush do it’s thing while painting.

You’re welcome to use any Brush style for the exercise, but for the purpose of this tutorial, we’ll use script style.
For this example, I’ve chosen ‘Gaston’.
Yep, my own name. Easy.
Now that you’ve got your killer Lettering design, let’s move on to the next phase.
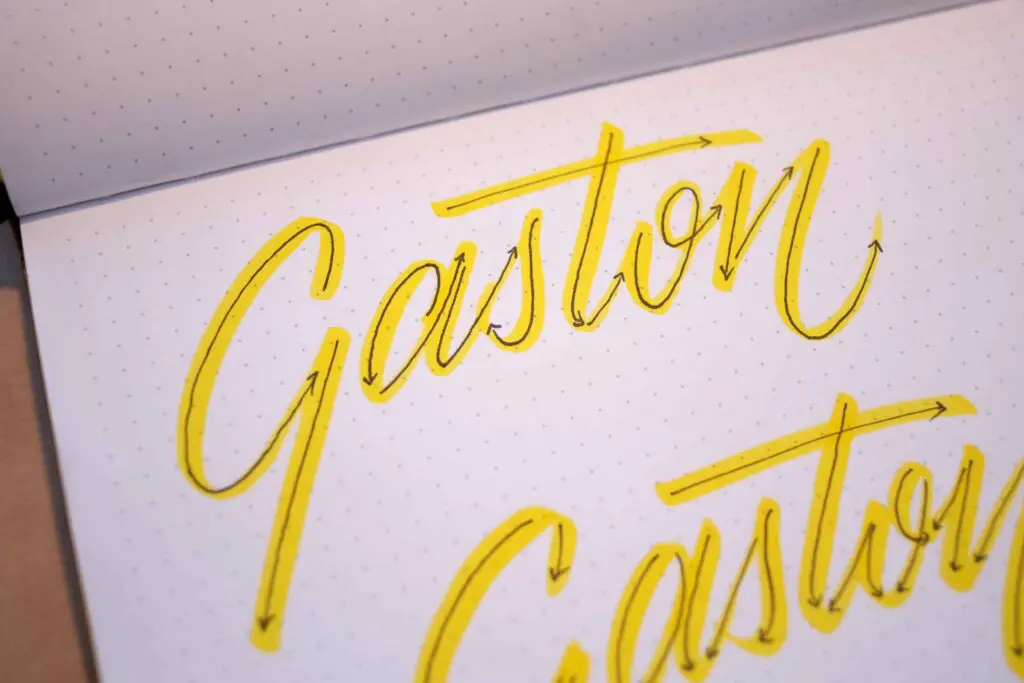
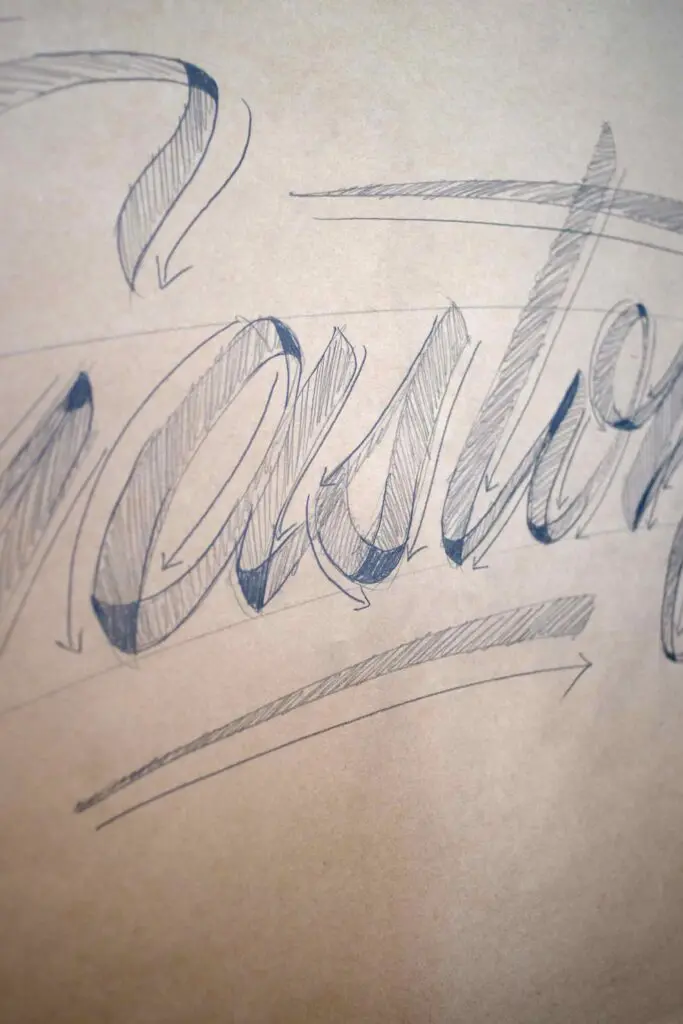
Identifying the Strokes
Now, here’s a nifty little trick.
This changed my way of seeing brush lettering altogether.
Check this out.
Unlike lettering, sign painting is not painted in a continuous motion – the strokes that compose a letter and its connections are all painted individually, one at a time.

Thus, as you can figure out,
it is convenient to identify and single out the strokes in your lettering, as this is how you are going to piece your painted design together.
Go over your design and single out the different brush strokes: Downward, upward, curves, connectors.
Try to imagine how you would have painted this design had you used a brush instead of a pen.
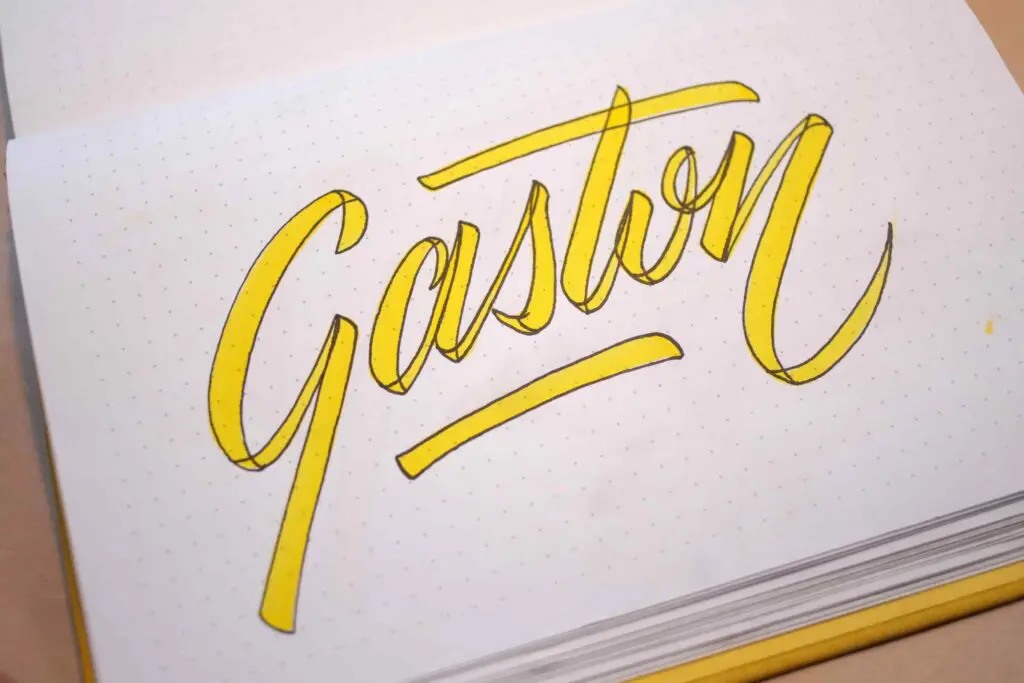
You may have noticed how strokes overlap in corners.
It is important to recognize where strokes overlap, as this is where you will be starting and finishing your strokes in order to connect the letters altogether.
Wow!
Getting real close to sign painting now.
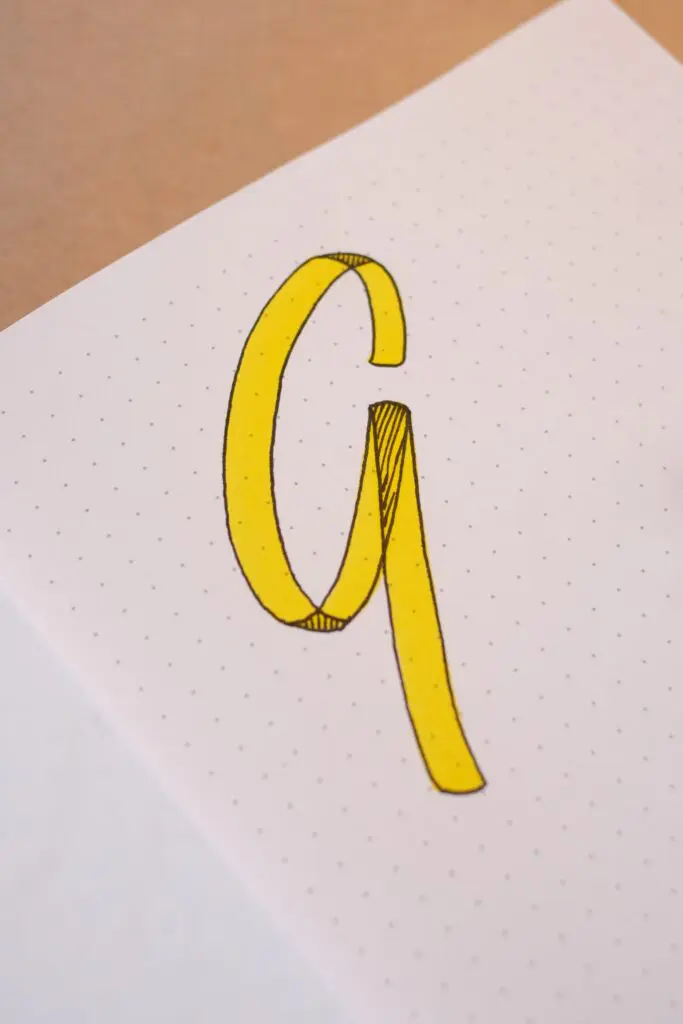
Ductus
Now, here is another difference from lettering to sign painting worth noting:
Looking at the strokes that need to be painted in this lettering design, it is noticeable how you would paint them with a brush, and it’s quite different from how it’s done with a brush pen.
Observing the strokes in this lettering design, try to figure out how you would paint them with a brush. It’s quite different from how it’s done with a brush pen.
Sign painted Letters tend to have much more downstrokes, so as to be pulling the brush, not pushing or going against the flow of its bristles.
Got that covered? Let’s paint!

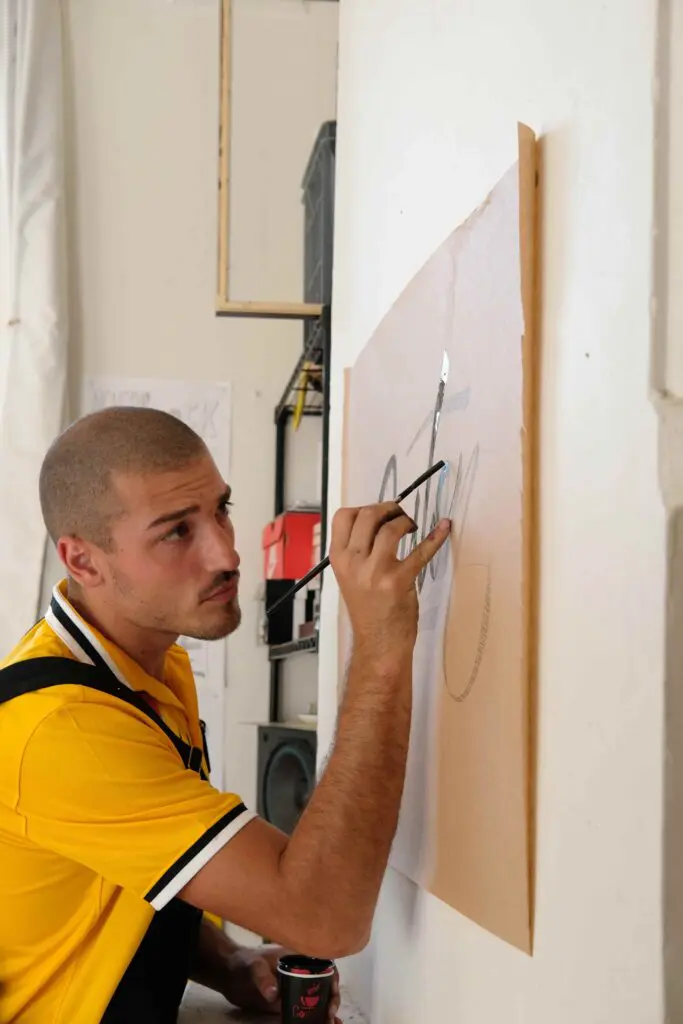
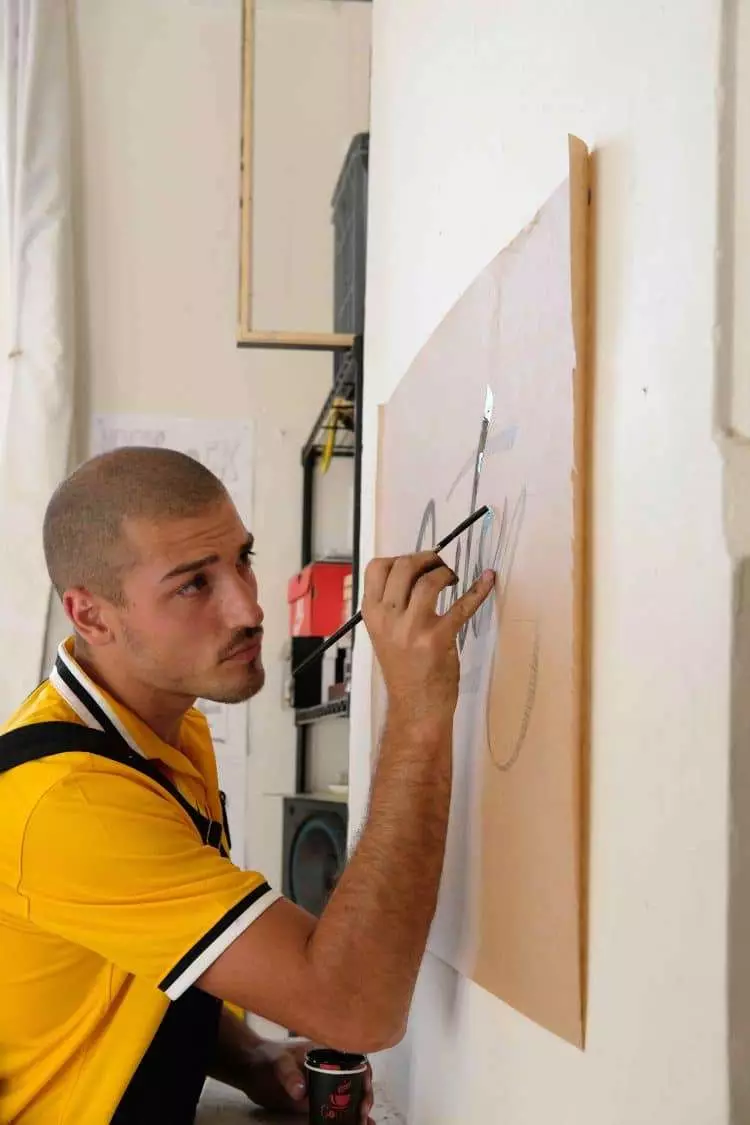
Okay, first of all, let’s get comfortable.
Clear out your workspace, make sure you have ample room, all your materials, and a well-ventilated area.
Bring out your roll of paper.
Tack it onto a wall and work vertically, as you will come to find that the angles of the brushes movement have a considerable effect on the strokes you will produce.
(Remember down thick up thin?).
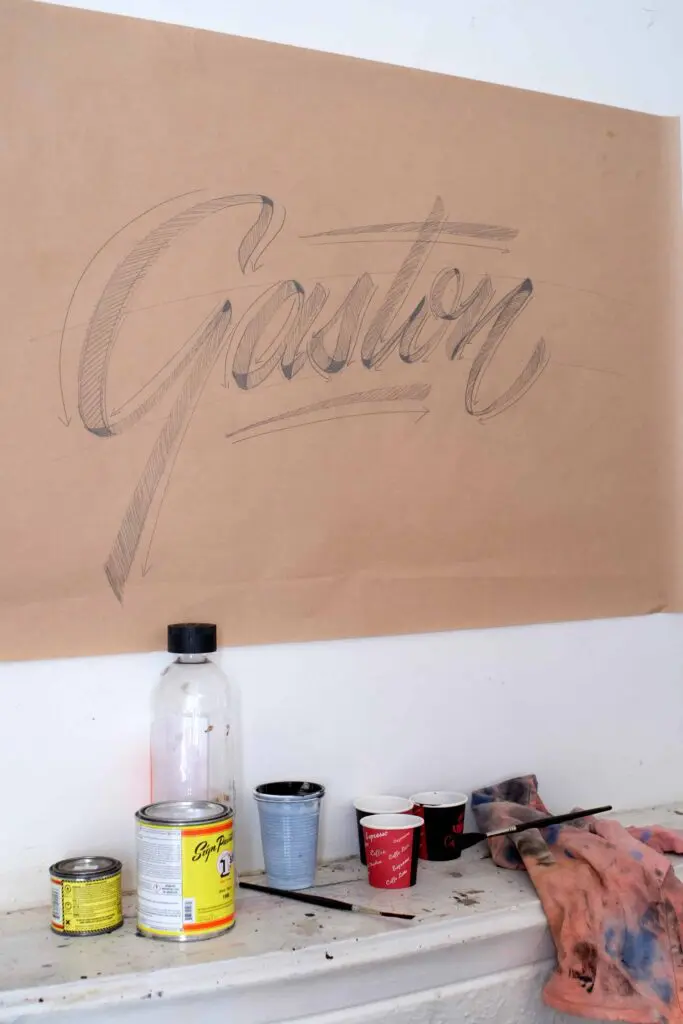
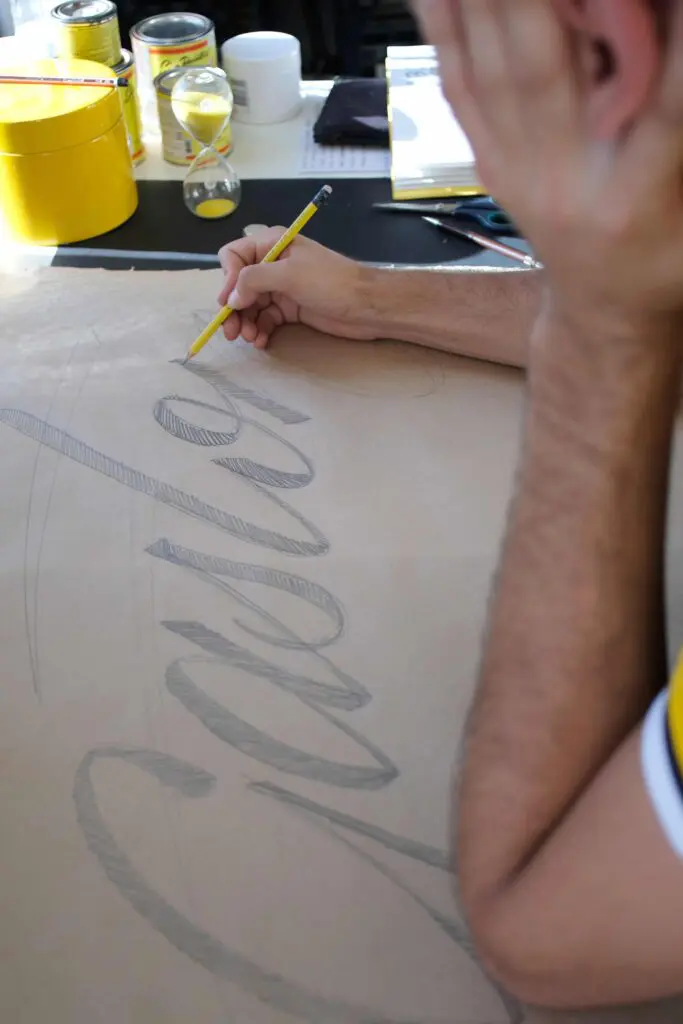
Now we need to prepare the design.
Sketch out your Lettering, or transfer it if you wish, using a projector or printing it out.
Here is how I do it:
• Trace a Baseline
• Trace an X Height
• Scribble the Lettering in
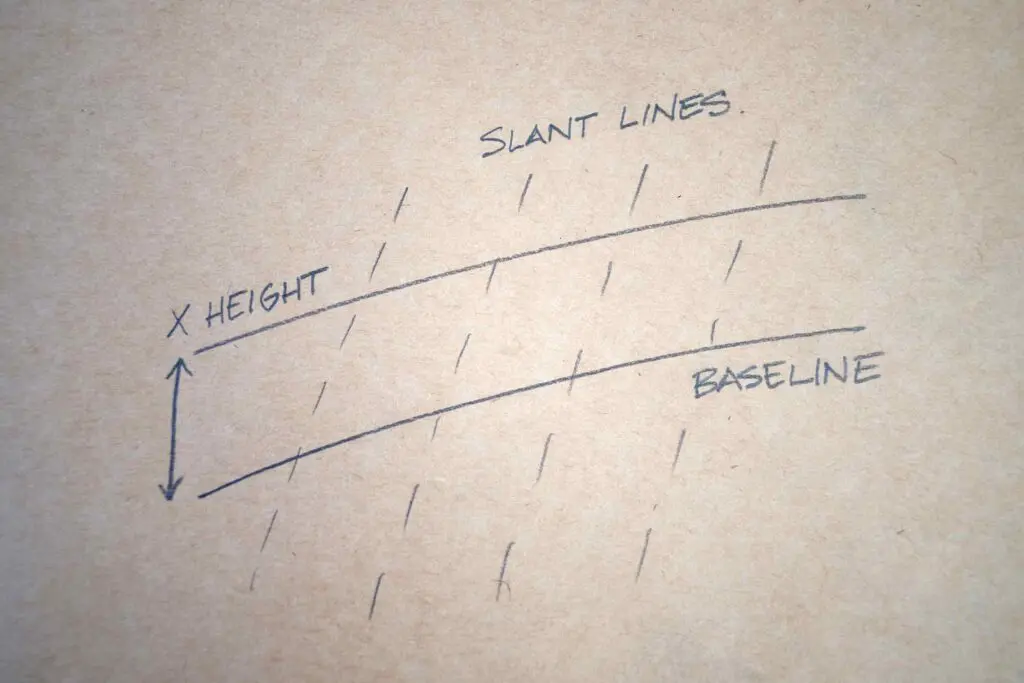
Don’t mind the letter shapes too much – just focus on their size and spacing.
Identify your ductus, and plan the strokes you are going to paint.
The important stuff
Before painting, pour your thinners into three separate cups, you’re going to need to have them ready once you start painting.
I use one cup of thinner to get rid of excess paint, the following to clean it, and the last one to guarantee a spotless brush.
Wipe your brush dry in between each wash from the cups.
Take care of your tools. 😉
Begin with slow strokes.
Focus on paletting the brush correctly, and entering and exiting strokes at the right moments.

Don’t worry too much about keeping a steady line or perfect curve, focus on your technique.
You’ll soon find that if you have the right paint consistency and paletting, the brush itself will do a lot of the work for you.
Press down on a stroke and it’s width will be consistent.
Remember those hairlines I was talking about?
We’re going to use them to connect strokes together and form smooth letters.
As you are bringing two strokes to an overlapping point, really strive to get those hairlines to interlock –
it’ll make your sign painting look natural and flowing, instead of clunky and miss-matched.

Most important of all:
Always remember to allow yourself to make mistakes.
If you don’t, you’re keeping yourself from the best opportunities to learn.
There’s a reason I mentioned a whole roll of paper.
Burn through it.
Critique your own practice, and work upon what you see faulty. It’s the quickest way to improve.

Amazing!
Following these steps, you should have just completed hand painting your own Lettering.
Congrats!

Final steps
First of all, Pack down.
It’s remarkably important.
I can’t stress enough how important it is to properly clean your brushes so as to not ruin them!
Go through your 3 little cups of thinner – dirty, less dirty, and lastly a perfectly clean cup, wiping excess paint and thinner on the rag between each wash.

Once clean, oil your brush tips thoroughly with Brush or Lard Oil, or you can apply Petroleum Jelly to them like I do.
Loving it?
Want to keep on going with sign painting?
Practice, practice, practice.
You will end up developing confidence and speed in your strokes, and an understanding of the skill that will allow you to paint your own lettering designs on the fly.
I have created some A3 cheat sheets for you to print and practice your letters and strokes with.
Drop your email below, follow the instructions and get access to the worksheets. You will also be able to download all the other worksheets currently available in the Lettering Crate.
Stay updated with my tutorials and get instant access to the Lettering Crate –
A growing library of free lettering & calligraphy resources that includes –
Design your lettering! Who knows where you’ll end up taking this skill!
Hope you have enjoyed this tutorial and found it useful.
I certainly wish I had read it when I started out!
Cheers and Happy Painting!
– Gastón
Until the next one,
Stay AWESOME!

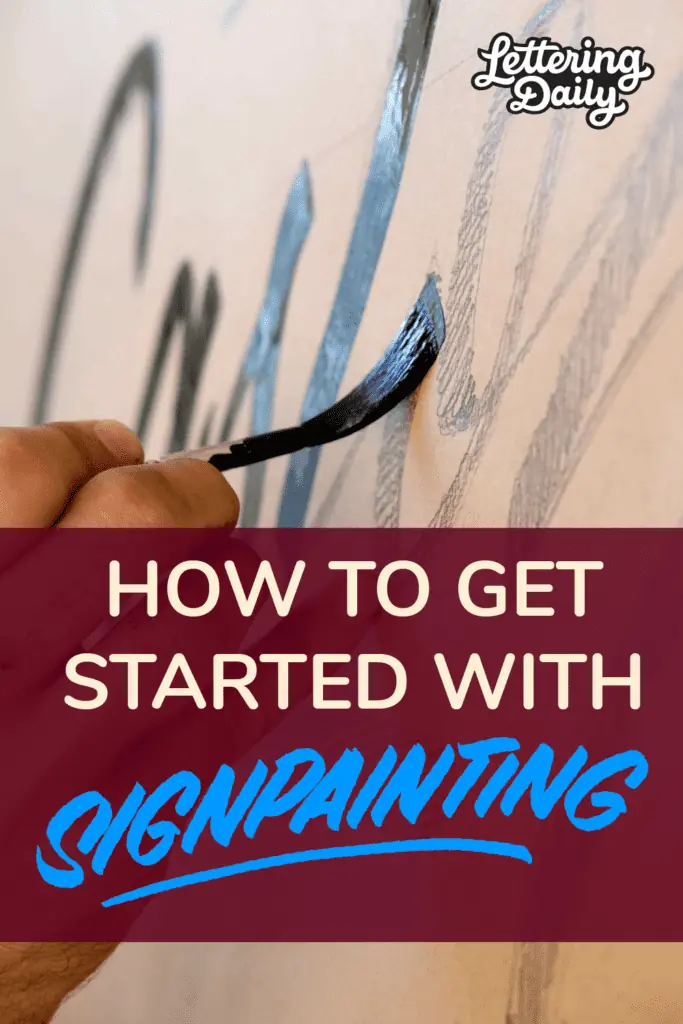
Pin me!
About the author
Gaston is a self-taught sign painter and lettering artist based in Melbourne, Australia, who managed to turn his passion into a career throughout hard work and dedication. Gaston not only does bespoke lettering designs as a full-time job but also works in the educational field, organizing workshops, working on online publications etc.

Thank you for this guide – it was amazing!
This is such a good resource! Thanks so much for putting it together. I made a concise list of things you need to have to start sign painting. No need to buy anything just useful info. https://getmestarted.co/sign-painting/
Gracias por la información. Me ha servido de gran ayuda
Thank you so much for this tutorial. I’ll start to paint lettering even if I’m not as young. I love it. I live in Milan (Italy). How can I get some other tutorial from you and also lettering examples?
Ciao, Paolo
Ciao Paolo! You can check out this tutorial 🙂 – https://www.lettering-daily.com/sign-painting-3d-letters/
Am New member, from Kenya, I have learned alot and I wish to know more out of it
Welcome, bro! 🙂
Hi I have been a sign writer since
1983 went to collage for five years and studied hard got my qualifications if anybody said that the sign writing business is easy it’s not specially if you try to set up for yourselves getting knock backs making mistakes is only a part of it . I’m 60 still doing signs CAD and painted signs I love it. If you have to use a computer to print out your layout then that’s fine it gives you more time to plan and paint its not cheating it and easy way of sign writing I’m all for that. But practice makes perfect.
Thank you for your comment, Barry! Would love to see some of your work 🙂 You can always shoot me an email with some links if you have!
Hello and thank you for this tutorial!
I noticed you mentioned a few times there were downloadable worksheets. I’m excited to get started however, when I download from the freebies page there’s is just one page available for download that illustrates just 3 strokes. Is that the entirety of the worksheets that go with this tutorial? I feel like something is missing and would love to know more.
Thank you so much either way!
~g
Hello Ginger,
Yes the single sheet is currently the only freebie that comes with this article. I will reach out to Gaston and see if we can add something on top of that. Cheers!
Very instructive and useful. Also inspirational. Thank you Gaston!
Woop Woop!!
i am 30 years into this business. I paint signs for a living daily. Anyone who thinks they can learn this in a online tutorial is sadly mistaken. It takes 3-5 years to learn the basic fundamentals of letter construction, how to construct certain alphabets along with the formulas that go with it, colour theory, layout and the list goes on and on. Just because signwriting is trendy due to the release of the documentary and social media glamorizing the industry doesn’t mean you can become a signwriter over night. Go out and track down some real signwriters and they will tell you straight up how hard this is to do for a living and the hrs involved to be able to survive.
Hey Justin, thank you so much for your comment I really appreciate it. I 100% totally agree with you. You can’t learn this skill just by reading a single article, watching a video tutorial or even attending just a workshop. It takes time, a lot of effort and most importantly you need to be dedicated to the craft in order to learn it. This goes for any calligraphy script or lettering style you are trying to learn as well. My apologies if this article gave you the impression as it tries to simplify the whole process. That wasn’t the point. We just wanted to share some very basic ideas on how to get started. Hope you can understand our point of view, and if you have any constructive feedback/suggestion on what to add in a future update, i’ll be more than happy to have a chat with you 🙂 Best,
Max
You sound salty. Try to help some others out and see how good you feel. Not everyone wants to paint daily and/or for a living. Some people just appreciate knowing how to do something new and want to paint for family and friends. They, too, can be real sign painters…even if they are not making money or how they learn to do it doesn’t fit your career path. Be well.
haha thanks, Anthony. I mean I really do understand Justin’s point of view. I can see that he takes a lot of pride in his work, especially considering his vast experience in the field. I just think he didn’t really understand the whole idea with this tutorial. The idea was to give people a glimpse into the world of sign painting, and hopefully encourage others to learn more about it. That’s all, there is no secret agenda and we did all of this for free. But it’s all good I don’t take it personally, I just hope he didn’t 😀
Some of us just have it! Some of us need be taught it over years. I’m pleased you persevered with it a managed to make a living out of it.
Here Here ! Agreed in total!
I studied for years brush in hand each day watching some great old 1950’s 60’s sign-writers and being forever guided by them.
First step is to learn to ‘visualise’ and not until you can see many, many type faces and how to master each and every one of them on a blank surface, and where they are going to play a part in the planned layout do you become a ‘real’ sign-writer.
Charley Foskett – UK veteran artist, painter, lettering artist, sign-writer and full time music producer, music arranger and folk singer/songwriter.
Hello !!
I am an artist painter in France and try to get started in painting on shop windows; thank you so much for this tutorial that helped me!
On the other hand, could this painting also be used to make drawings, like illustrations on the windows? (Sorry or my bad english ?)
Hey Fay, thank you for the kind words! I am pretty sure you could use this technique to do illustrations as well 🙂
So great i found you on pinterest
I am an tattooartist from Belgium and I love lettering
Sign painting is so cool
Sometimes i wished I had some more time to have time for it
But very busy with my tattooing
Love your work
Thank you Mariska! Believe me, i know exactly how you feel. I wish i had more time to do more things but it always feels like there are never enough hours in the day 😀
Great info I would of liked to know how to prep a wood sign before painting with 1 shot. And how to protect it from weather outdoors
Hey Ricardo, sorry for replying so late. I think the best course of action is to personally reach out to Gaston (via Instagram or email) and ask him those questions. Gaston is a really cool and friendly guy and im sure he will gladly answer all of your questions!
I am currently retired also. However. I made a decision not that long ago to take up the Skills (once more) of a Trade that (for all intents and purposes; was somehow forgotten) was forsaken shortly after the *Advent of Microsoft etc. “Never say never” (as so aptly applied) …, were {many} of my Collegues of the day; but alas, *they too fell by the wayside of Modern Technology …, one by one! There is a factor in Computer Assist Design (CAD) THAT will never replace: Professional Sign Lettering Art! Sign Lettering Art IS NOT *Graphic(s)!?! Be aware. The Lettering Guild(s) of the World; back in the day, would not agree with such a move. But! Fast forward; it’s Status Quo. Unfortunately, (we) gave in to this movement in the modern, fast-paced Society’s objective(s) of executing Signage (need *it yesterday) that would meet fast-paced stringent demands! So much for the *Speedy-Gonzales hands-on maneuver of yesteryear!(?) Anyhoo; nuf’ said.
Great article! saved this article for future reference. Being a letterer and a calligrapher myself!
Gastón,
I started out as a novice sign painter nearly 50 years ago, and worked side by side with a master sign painter for years.. I already had a backround in graphic arts and calligraphy and took to this very easily. Over the years I designed and painted signs, murals and taught others and did so much artwork I have forgotten half of what I did. Now I have been pulled out of retirement to help restore hand painted antique signs, and currently an old glass cigar sign. I was unsure of myself to do this, as I ususally just paint portraits now for my grandchildren and artwork for family and friends. It took me awhile to find the right paint, (1shot) as I could not remember the name, and getting the right brushes again. But I want you to know that it brought tears to my eyes to read your tutorial. I could hear my old Mentor in my mind as I read, and I remember my impatience as a young student having to work on the paper for what seemed forever, practicing strokes: over and over and over again. I want you to know, YOU are an excellent teacher. I thank you from the bottom of my ‘paint stained’ heart for bringing to mind the old lessons in such a concise and easy way. God bless
D’Irina
This may be a little late but it makes me so happy to see women sign painters being successful. I did mine for 18 years at a golf tournament. Best time ever. I don’t play golf but I do watch it in between jobs on the course. I still use my sign painting skills along with using a Photoshop, Illustrator and regular brush painting.
I’m now in my 70’s and can still hang off the ledge of a 40 ft cargo truck to paint a logo for my client. Men do a double take – and I only have to laugh. I love making letters!
With a flourish,
Dolores Russo
Former onsite artist at the Greater Hartford Open –
This is great stuff!
Thank you Johnny! We are really happy to hear that you enjoyed the tutorial!
I really appreciate your tip to try and have a comfortable posture when you are painting a sign. My wife and I have been thinking of getting a sign put up for our daughter’s lemonade stand that she wants to put up this weekend. I will be sure to tell her my wife that we should be in a comfortable position when we paint!
Hey Mark, thanks for the kind words!
It’s great that you’ve noticed, the position, the posture and the placement may seem as something small but they have a great impact on the outcome.
This is exactly the reason it’s essential to having a comfortable workspace as well as keeping a good posture 🙂
Would love to see the sign you will create, be sure to drop a post on the forum once its done! 🙂
Cheers!
Where is your video? Some of us learn by seeing, I am one if them, please post a tutorial video. I believe you are a genius letterman. Thank you!!!
hahaha! SOON!! 😀
We will definitely talk to Gaston about that 🙂
Thank you for this gorgeous and informative tutorial. So much eye candy seriously ?. If you make a book l would buy it so fast. Please consider it.
Thank you for the kind words! we are very happy that you found this tutorial to be helpful 🙂
Gaston really outdid himself on this article, really providing massive value! As for the book, that’s definitely not a bad idea 😀 I’ll be sure to suggest him that!