
This post and the photos within it may contain affiliate links. If you purchase something through the link, I may receive a commission at no extra charge to you.
Hello Everyone, my name is Sue Higginson, and I am a calligrapher from the UK.
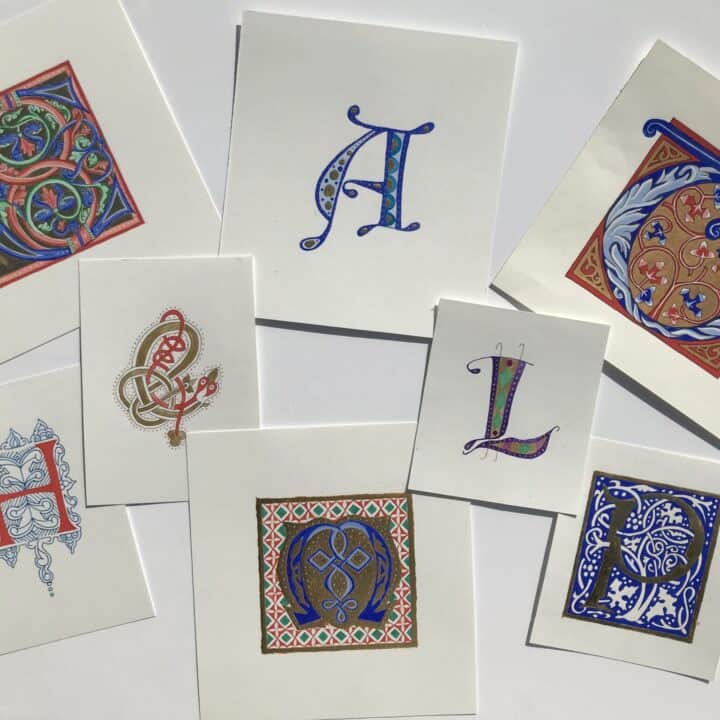
I’m going to be talking you through the process of creating a beautiful illuminated letter from scratch using real gold.
These letters are such fun to make, and the techniques of painting and gilding can be applied to border patterns as well to create the most amazing works of art.
Here is a quick outline of the order of this tutorial.
- A brief history of illuminated letters.
- Materials you will need for your project.
- A step-by-step guide to the process.
- A few extra tips
- Further Study and book recommendations for illuminated letters.
- Final Words
Without any further ado’s, let’s get started!
1. A brief history about illuminated letters

Before we start, here is a little about the history of illuminated letters in manuscripts.
The word ‘illumination’ comes from the Latin’ illuminate’ and means to enlighten.
It refers to the addition of bright colors and especially gold and silver, to decorations in manuscripts.
Silver tends to blacken over time, so gold in various forms, such as powder and leaf, became the preferred choice of illuminators as it retains its brilliance.
Books, especially religious texts, were illuminated for practical reasons as well as to honor deities.
Lavishly decorated letters marked the beginning of passages and gave visual clues to the context of the page.
Huge full pages of decoration, as in the Lindisfarne Gospels, separate the book into sections.
There are many different styles of illumination, and in western manuscripts, you can find stunning examples from the Celtic (Book of Kells and Lindisfarne Gospels), through to Anglo Saxon (Grimbald Gospels), Ottonian, Romanesque, Gothic, Whitevine, Classical – right up to a reinvention today with gorgeous contemporary illumination.
This isn’t a definitive list of styles – have a search online and discover which ones inspire you most!
2. The materials needed to create an illuminated letter

Making an illuminated letter doesn’t need to be as expensive or require as many specialist items as you may think!
You will need a few basic materials, and then as you experiment, you can invest in more niche materials if you would like to try specific techniques.
For a basic letter, you will need (links to Amazon) –
- Paper – Cartridge paper and a good quality smooth watercolor paper, I use at least 135lb weight.
- A Pencil – I like to use a mechanical one for precision.
- Eraser.
- Tracing paper.
- Gouache – any colors, but for this project I used Ultramarine, Cadmium Red, Permanent Green Middle, and Permanent White
- Palette
- Water to mix gouache
- Fine brushes – A small selection.
- Fineliners – I use Micron or Copic 003.
- Transfer gold leaf.
- A size to attach the gold – I recommend Kolner Instacoll
- Glassine Paper
- Burnisher or Q Tip
If you don’t want to use real gold then try gold watercolor, ink or gouache I would recommend Finetec Arabic Gold.
In that case, you wouldn’t need the gold leaf, size, glassine paper, or burnisher.
3. Step-by-step guide for creating an illuminated letter
Step 1 –
The first thing is to decide on your letter design.
You could look online for inspiration or design your own.
I have chosen a Romanesque capital D from the Hunterian Psalter 1170.
Sketch out your design in pencil on cartridge paper.
You could trace an image if you felt you wanted to.

Step 2 –
When you are happy with your design, trace it onto your good quality smooth watercolor paper.
Carefully outline your design with a fineliner or brush and erase any pencil marks that are left.
You now have the design clearly marked out for you to be able to apply the gold and paint.

Step 3 –
Now it’s time for the gold! First, the size has to be applied.
I’m using Kolner Instacoll. Use an old brush to apply the instacol as it tends to spoil them.
Soaking the brush in water first, so the bristles absorb some helps to protect it.
You need to pick up a bead of Instacoll on the end of the brush and place it carefully, so it puddles where you want the gold to be.
Gently pull at the edge of the puddle of Instacoll to direct it where you want it to go.
Don’t ‘paint’ with it.
You don’t want the brush to touch the paper.
The Instacoll needs to be ‘floated’ so it dries with a flat surface.
When you can pull the puddle no more, drop another bead of Instacoll into it and continue.
You are aiming to add wet into wet.
It is possible to build up layers of Instacoll if you like more of a raised gold effect.
In this case, just wait for it to dry and add another layer on top.
Here is a quick video of me applying the instacoll to the letter –
Step 4 –
The Instacoll dries in roughly 10 minutes.
Check it is dry by lightly touching a small area.
Next, you need to reactivate it by breathing on a section to make it sticky again.
Roll a piece of cartridge paper to make a fat straw about 5cm long.
Use this to ‘huff’ deep breaths onto the instacoll.
Place the transfer gold, shiny side down on that area and press firmly.
Peel off the sheet slowly, and the gold will now be attached to your work.
If small areas of gold don’t stick, don’t worry.
Just breathe again on that area and reapply the gold.
Any untidy edges can be lightly brushed away with a clean brush.
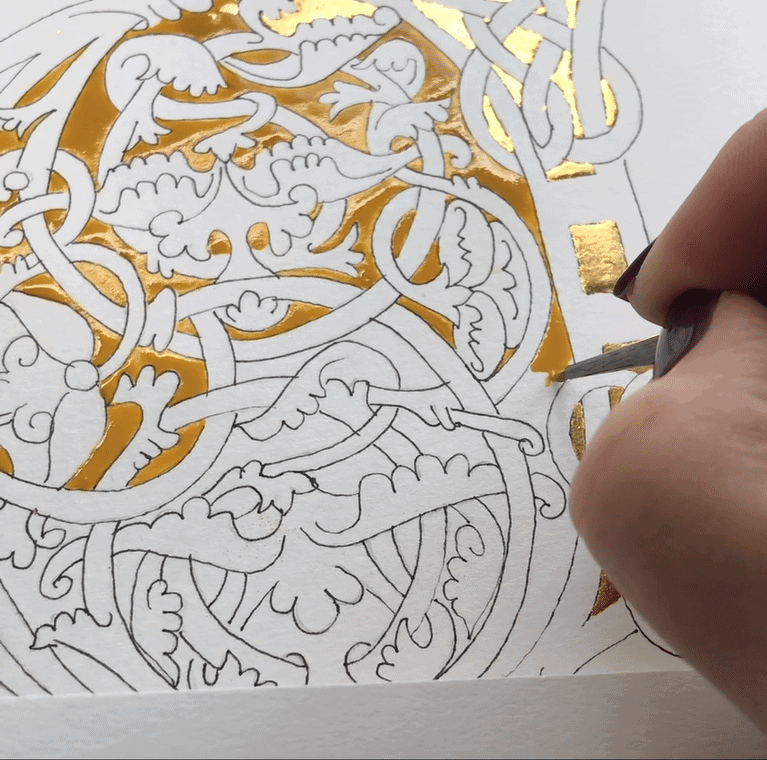
Once all the gold is stuck, it can be polished with a Q Tip directly or place a piece of glassine paper over it and polish with a burnisher.
Below you can see a video of me applying the gold leaf to the letter.
Step 5 –
Now it is time to paint!
Mix the gouache to the consistency of single cream.
Add a little Permanent White to the primary color to make a mid-tone and paint this first.
Use a piece of paper as a guard to keep your hand away from the gold.
Do all of the mid-tones at the same time and leave to dry.

Step 6 –
Mix a light and darker shade of the main colors and paint these in to add detail and depth.
Use white for highlights.
Make sure you leave plenty of time for the paint to dry between adding the different shades.

Step 7 –
Finally, carefully outline with a fineliner or fine brush.
This final touch really lifts the letter and brings all the elements together.
Congratulations, you are all finished and have a beautiful illuminated letter!

4. A few extra tips for illuminated letters
Make sure you work on a flat surface in good light and sit in a balanced position.
Keep all your materials well away from your working piece to avoid any spills or accidents.
The Instacoll can be a little tricky. If you dilute it by about 10 percent, I find it a lot easier to use.
Washing the brush regularly with soapy water will help to protect the bristles from the Instacoll.
Use the edge of your little finger to test if the Instacoll is dry. That way, if it’s still tacky, you won’t leave fingerprints in it.
Garlic juice makes a perfect and cheaper size – the smell will soon disappear.

5. Further study and book recommendations for illuminated letters
There is nothing quite like seeing real manuscripts in libraries and museums.
If you get to the UK, The British Library is a must to visit or check out its digitalized collection.
Another idea is to look for local calligraphy societies for workshops.
Social media, especially Instagram, has a wealth of talented calligraphers whose work is so inspirational, so do check it out.
There are so many beautiful books on this subject, but here are a few of my favorites (links to amazon) –
- The Art of Illuminated Letters – a practical guide for calligraphers – by Timothy Noad and Patricia Seligman. This is a lovely book with step-by-step guides to create five illuminated letters from different eras.
- Illuminated Letters – a treasury of decorative calligraphy by Margaret Morgan. This is a comprehensive little guide with an excellent section on tools and materials. It has a superb contemporary gallery at the end as well.
- Illumination gold and color- by Patricia Lovett. This book is packed with advice on color theory, applying gold and making and using gesso.
- Calligraphy, Illumination, and Heraldry – a history and practical guide- by Patricia Lovett. This book is absolutely crammed with information. A superb section on calligraphy and another on illumination. It has practical advice from getting commissions to gilding. The final part is a comprehensive guide to heraldry.
Final words

Have fun experimenting with different designs. Individual letters make a lovely gift or combine an illuminated letter with a favorite quote to create a beautiful piece of art!
If you have any questions, be sure to drop a comment below or you can also reach out via Instagram.
Do come and check out more of my art on my Instagram account:
Don’t forget to say hi!
If you’re interested in learning other calligraphy styles, be sure to check out the ultimate guide for calligraphy beginners.

Stay updated with my tutorials and get instant access to the Lettering Crate –
A growing library of free lettering & calligraphy resources that includes –
Pin me!

How To Draw Illuminated Letters
Learn how to draw illuminated letters by following these steps.
Materials
Instructions
- The first step is to decide what you will create. A good idea is to look for inspiration in historical manuscripts.

- Once you've decided what letter (and style) you wish to create, sketch it out on the cartridge paper

- Using the tracing paper, transfer your sketch from the cartridge paper to the smooth watercolor paper. Carefully outline it using a fine brush or a fine tip marker (fineliner).
- Once the sketch has been transferred, it is time to apply the gold. Grab an old brush and start generously applying the instacol on the areas where the gold will appear.

- Once the instacol has been applied it will take about 10 minutes to dry. Using a piece of cartridge paper, create a wide straw (about 5cm long). You need to breathe warm air on top of the instacol to ''reactivate'' it - so the gold leaf can stick to it. Take the gold leaf and start applying it firmly on the instacol areas.

- Now you can start painting the rest of the letter. Start by adding the mid-tones first and let them completely dry (to avoid any mess).
- Mix light and darker shade of the main colors and paint these in to add detail and depth. Make sure to have intervals in-between each layer so the paint can dry completely.
- The final step is to carefully outline the letter using either a micron pen or a very fine brush. Congratulations! You've successfully painted your illuminated letter 🙂

Recommended Products
As an Amazon Associate and member of other affiliate programs, I earn from qualifying purchases.


About the author

I am Sue Higginson and I am a calligraphy enthusiast from England, UK. I started learning foundational hand in an evening class about 25 years ago and what began as a hobby soon became a passion. I joined local societies and attended workshops and classes to learn new hands and techniques. I have a particular interest in illuminated manuscripts and draw a lot of inspiration from them in my own work.
Wonderful! Thanks for sharing with us! Because I am an absolute beginner with this technique, I am allowed to ask the question: why / when do you use the Glassine paper? Thanks in advance!
Marie Hagemann
Hi sue can you guide me to somewhere where i can find or purchase different scripts of letters to trace. Many thanks Mel.
Hello Melanie, One of my favourite books for inspiration is called ‘Decorative Alphabets and Initals’ edited by Alexander Nesbitt. It is full of black and white line drawn letters from different historical times. It would be possible to trace them if you wanted. I hope this helps.
Enjoy your illuminating!
Sue
Hi Sue,
I am so glad that you published this class. I have always been a fan of your illuminated letters and wanted to try them myself. After putting it off for many days, today I finally read it and will give it a try very soon. Though I don’t have the proper illumination supplies but I’m too motivated to create something with even watercolors also.
Thanks a lot Max for one more amazing guest tutorial.
Ekta Chahar
Delhi, India
Thank you, Ekta for the constant support! I am happy that you liked this article and I look forward to seeing your illuminated letters! 🙂
Hello Ekta.
Thank you so much for your kind words. I am a fan of your work especially your copperplate. Do have a go and make sure you tag me. I’d love to see what you create.
Thank you again
Sue
Hi Sue,
I have always wanted to learn how to do this! When we were children living in Wales, we used to sit and watch our Grandfather illuminating letters and were fascinated. Fortunately we have Bibles with our names illuminated inside. Now I am retired I will be giving it a go!
Many thanks and stay safe,
Dianne
Sydney Australia
Wow! Thank you for the kind words Dianne, I am really glad you enjoyed this article. Even more to hear that you were inspired to try it yourself!
Hello Dianne,
How amazing! I’m so pleased this article has reinforced a lovely memory for you and how lovely you have the bible with your names illuminated by your grandfather. I hope you enjoy making a letter yourself and may it be the first of many. Thank you for your kind words as well. Sue Higginson